Crocheting is a whole world of needlework with its own rules and characteristics, entering into which it is no longer possible to go back. This craft rewards craftswomen with beautiful and original things, you only need to learn its basics - knitting columns.
In order to feel confident in the future, beginners need to learn how to crochet the simplest elements, thanks to which it becomes possible to create paintings of any complexity with a variety of patterns.
Crochet Starter Master Class
Any pattern created by a hook, from the simplest to the lush and openwork, is created by combining air loops and several types of columns. If you learn to knit them perfectly, you can safely proceed to crocheting things of any complexity.
What are the main types of crocheted crochet posts?
- Single crochet
- Double crochet;
- Half columns;
- Columns with two crochets;
- Embossed posts;
- Lush bollards.
Single crochet

This species is considered one of the most used methods of knitting columns - and therefore a basic skill necessary for all craftswomen. The crochet of crochet columns allows you to get a dense fabric of low columns, not characterized by high elasticity.
This knitting technique offers several options for knitting loops: for the front wall of the loop, for the back wall and for both walls. Depending on this, the pattern on the canvas will also differ. Often crochet involves knitting on both sides of the loop (in other words, for both half-loops of the upper braid) - this is the option that is often assumed in all knitting patterns. Consider How to crochet a crochet column using an example of a step-by-step scheme:
We knit a chain of 20 air loops plus 1 lifting loop. We knit the first column in the second loop from the hook. We introduce a hook under the two walls of the loop, grab the thread and pull it through the loop: two loops formed on the hook (photo 1). Now again we pick up the thread and pull it through both loops. One loop remains on the hook. We tied a single crochet (photo 2).

Next, we knit the first row of columns, but grab the air loop for the front wall - it’s more convenient to knit the initial row (photo 3). We turn the work over, we knit one lifting loop, and then a row of columns, picking up the loops on both walls.
In order to make the edge of the canvas even, it is important to knit the first and last loops of the row correctly. Often, especially if they are knitted with thin threads, the first loop of the row is skipped and the columns of the next row are knitted immediately into the second loop, or they forget to knit the last loop of the rad. Be careful and, while studying, count the bars. You should always get 20 columns (lifting air loops are not included in this number) (photo 4).

Concerning two other ways to crochet, this is done as follows:
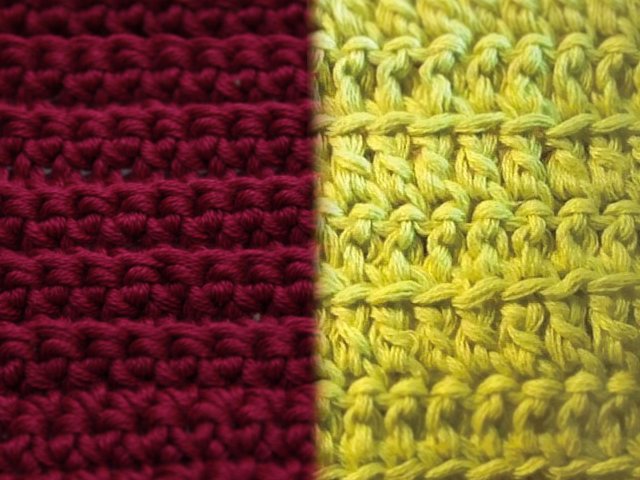
 Behind the front wall - so calledcolumns for the front half-loop fit if you enter the hook for the first half of your upper braids.As a result, the distant half loops remaining free fall into an even thin strip on the back of the canvas.
 Behind the back wall — columns for the distant (back) half-loop fit if the crochet hook is inserted for the second half-loop of the upper braid from you. Such a canvas has relief concave and convex rows.

In any of the selected methods for a set of single crochet columns, the first column in a row is always knitted for both walls of the loop so that the edge is smooth and dense enough.
Half-column
Knitting with half columns or connecting posts is not so common, since the fabric from these loops is very dense and stiff. The half-columns are very low. Often they connect fragments of lace sewing, go from one to another row when knitting in a circle, they also fix and process the edges of the fabric at the final stage of knitting.
There are two ways to knit a half-column:
- half crochet with a crochet - also called a strong column;
- half crochet - that is, connecting.
Consider for starters,how to crochet a crochet half crochet.

Let's start by knitting a chain of air loops. The number of air loops should be equal to the number of half crochets plus 2 loops for lifting. When the chain is ready (photo 1), we make a crochet on the hook (photo 2),

we introduce the hook into the third loop of the chain from the hook (half-crochet with a double crochet correspond to 2 lifting loops), grab the thread (photo 1) and pull out a new loop (now we have three loops on the hook) (photo 2),

grab the thread again (photo 1) and knit 3 loops on the hook in one go. It turned out half crochet (photo 2).

We continue to knit a series of half crochets with a crochet. At the end of the row we knit 2 lifting air loops (these loops are the first half-column of the next row), we turn our product over and continue knitting (photo 1). Here is a finished half-crochet with a crochet (photo 2).

Now find out how to crochet single crochet or connecting post.

It is difficult to knit half-columns starting with a chain of air loops, so dial 20 air loops plus 1 lifting loop and knit several rows with single crochet on both sides of the loop. Next, we connect several rows of connecting posts.
A lifting loop is not required in this case. Therefore, having knitted a number of single crochet columns, we turn the work over and immediately knit a half-column in the first loop. We introduce a hook under both walls of the loop, grab the thread and pull it through the loop and then immediately into the loop that is on the hook.
A half-column fits in one step - and so on until the end of the row. Turn the work over, knit the next row in the same way. To make it easier to knit, do not tighten the loops, make them wide enough, especially for the first and last loops of the row.

With a crochet

A double crochet is considered one of the most frequently used elements among all types of columns. Knitting it turns out pretty quickly, and the column itself is twice as high as the single crochet.
So, let's take a look at the step by step instructions. how to crochet a crochet post.
We knit a chain of air loops. The number of air loops should be equal to the number of double crochets plus 3 loops for lifting. When our chain is ready, we make a crochet on the hook (photo 1), insert the hook into the fourth loop of the chain (3 crochet loops correspond to the crochet column), grab the thread (photo 2) and pull out a new loop, we now have 3 loops on the hook (photo 3) grab the thread (photo 4) and knit 3 loops on the hook in pairs in 2 steps, i.e. First we knit 2 loops (we will have 2 loops left on the hook) (photo 5), then grab the thread again (photo 6) and knit 2 more loops. So we got itdouble crochet (photo 7). We continue to knit a row of double crochet (photo 8).At the end of the row we knit 3 lifting air loops (they will be the first column for the next row), turn over our product and continue knitting (photo 9).

With two crochets

A double crocheted column allows you to achieve a very high loop. This type of columns is used to obtain openwork openwork paintings.
After a chain of air loops, the number of which should be equal to the number of columns with two double crochets plus 4 loops for lifting, we make two crochets on the hook (photo 1), we introduce the hook into the fifth loop of the chain from the hook (two double crochets correspond to 4 lifting loops) grab the thread (photo 2) and pull out a new loop, on the hook we now have 4 loops (photo 3). Grab the thread (photo 4) and knit 4 loops on the hook in pairs in 3 steps, i.e. First we knit 2 loops (we will have 3 loops left on the hook) (photo 5), grab the thread again (photo 6).

and we knit 2 more loops (we will have 2 loops left on the hook) (photo 7), again grab the thread (photo 8) and we knit the 2 remaining loops. We tied a column with 2 crochets (photo 9). We continue to knit a row of double crochet posts (photo 10). At the end of the row, we knit 4 air lifting loops, turn our product over and continue knitting.

Raised
A very beautiful view of knitted columns that allow you to achieve a convex texture of the fabric - embossed crochet post. With such columns ornaments and patterns are knitted. And although the embossed column resembles a simple double crochet, it has its own characteristics. It differs in the way of attaching to the columns of the previous row: the embossed column is not knitted for the loops of the previous row, the hook is inserted under the columns themselves. In addition, it is important to remember that embossed columns begin to knit only after they have made at least one row of double crocheted or single crocheted stitches.
There are two types of embossed columns:
- embossed facial columns in front of work - "Convex";
- embossed seamy at work -Concave.
How they differ and how to crochet them - we will consider step-by-step methods of knitting in photo lessons.
Convex embossed posts

We knit two rows of simple crochet posts. Then we make a crochet on the hook (photo 1), insert the hook from the front side from right to left, under the column with the crochet of the previous row (photo 2), grab the thread (photo 3), and pull out a new loop (there will be three loops on the hook) (photo 4 ), then we knit like an ordinary crochet, knitting loops in pairs in two steps, i.e. grab the thread and knit two loops, again grab the thread and knit the two remaining loops (photo 5). In the method of knitting a double crochet “before work”, such a column is called a relief front or “convex”.

Concave embossed posts

We make a crochet (photo 1), then we introduce a hook from the wrong side from right to left (photo 2), grasping the leg of the crocheted column of the previous row (photo 3), grab the thread (photo 4) and pull out a new loop (photo 5). We knit loops in pairs in two steps, as when knitting a regular double crochet, i.e. grab the thread and knit 2 loops, again grab the thread and knit 2 remaining loops (photo 6). In the method of knitting a double crochet “at work”, such a column is called embossed wrong or “concave”. Similarly knit embossed embossed columns, embossed embossed half-columns, etc.

Lush

Beginning needlewomen must learn to crochet a magnificent column. This type of columns allows you to achieve an unusually beautiful openwork embossed pattern, which is also known as "puffs". In addition, the final version is similar to the "bumps" pattern. Lush columns are knitted with double crochets, and the more half crochets are connected in one loop, the more magnificent the column. Knitting lush columns follows from light and soft yarn, which will go to this pattern much more than to other types of columns.
According to our scheme, we draw a chain of air loops, make a crochet (photo 1), insert a hook 6 from the hook, loop a chain and stretch a long loop (there are 3 loops on the hook) (photo 2), make a crochet again (photo 3), enter the hook into the same loop of the base, grab the thread and pull out another long loop (we have 5 loops on the hook) (photo 4), make a crochet again (photo 5), insert the hook into the same loop of the base, grab the thread and pull another one again a long loop (there are 7 loops on the hook) (photo 6). Next, we grab the thread (photo 7) and knit all the loops on the hook in one go (photo 8). The result was a magnificent column. Next, tie 2 v.p. (according to the scheme) and knit lush columns in the same way (photo 9).

Lush bollards with a closed top

Sometimes lush columns are knitted with a closed top. They knit in the same way, they only finish them in 2 steps: we knit the same half-columns with a crochet, stretching long loops, then grab the thread (photo 1) and we knit all the loops except the first working loop (2 loops remain on the hook) (photo 2), grab the thread again and knit the two remaining loops (photo 3), then we knit 2 VP and knit fluffy columns in the same way (photo 4).

Video lesson
To fix a master class on crocheting columns for beginners, video tutorials will help.
Video “crochet columns”


 Behind the front wall - so calledcolumns for the front half-loop fit if you enter the hook for the first half of your upper braids.As a result, the distant half loops remaining free fall into an even thin strip on the back of the canvas.
 Behind the back wall — columns for the distant (back) half-loop fit if the crochet hook is inserted for the second half-loop of the upper braid from you. Such a canvas has relief concave and convex rows.