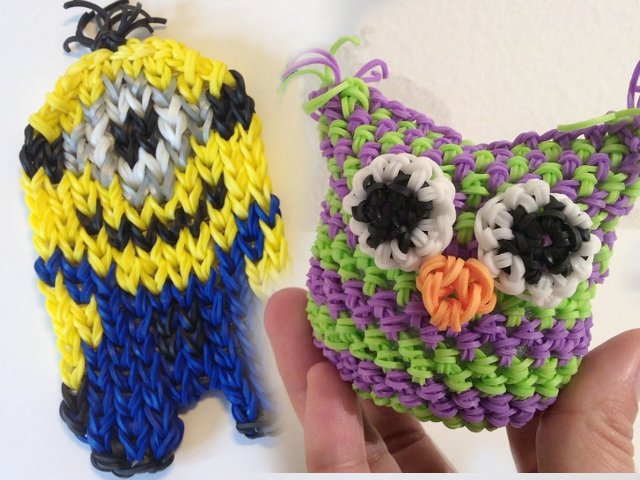
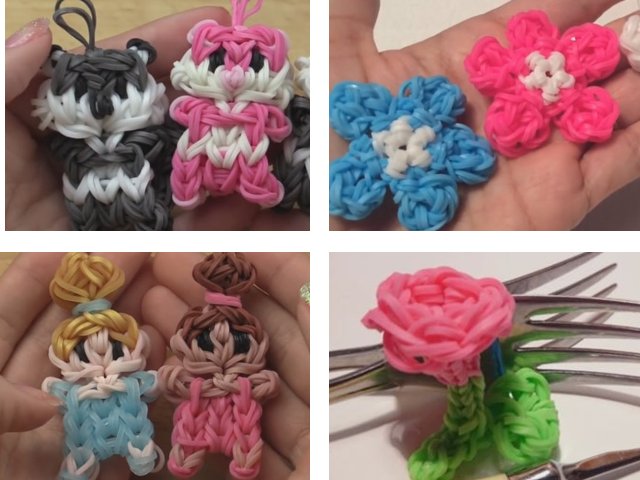
Weaving figures from gum is a very popular type of needlework among adults, and especially among children. The presence of a large number of multi-colored rubber bands, as well as a special slingshot, a large rainbow loom, a compact Monster Tail loom or even an ordinary fork allows you to weave the most unusual things, toys, figures, which will not only be useful in everyday life, but will also become a wonderful memorable gift . We have already examined in detail the waysweaving from gum bracelets of varying complexity. Another extensive subsection of this art is the weaving of gum figures.
Here you can also enjoy a variety of knitting methods, try to work with different tools and weaving patterns of varying complexity. The great advantage of this type of needlework can be considered the possibility of instant immersion in the process, because weaving from rubber bands does not require much experience or special knowledge, the main thing here is to follow the instructions and enjoy the process. Therefore, we will try to understand in more detail each method of weaving figures from rubber bands, while studying some popular methods and patterns of weaving completely free of charge.
How to weave rubber bands on a slingshot
Slingshot is one of the main tools that both beginner gum weavers and professionals work with. Making figures both on machines and without them is quick and easy. Weaving on a slingshot is considered one of the simplest and most affordable methods, since only two columns are involved in the work. Therefore, we can consider this as preparation for more complex knitting methods, for example, on Rainbow Loom or Monster Tail machines.
Simple figurines for beginners
To begin with, it’s worth mastering simple figures from rubber bands. Weaving for beginners provides methods of knitting on fingers, forks, two sticks and much more, and most importantly - on a slingshot. Beginners should not be afraid of difficulties, since most simple gum products are made according to the standard scheme: the first step, the second step, repeating the second step to obtain the necessary shape, and completing the work.
- Jumping ball without a machine
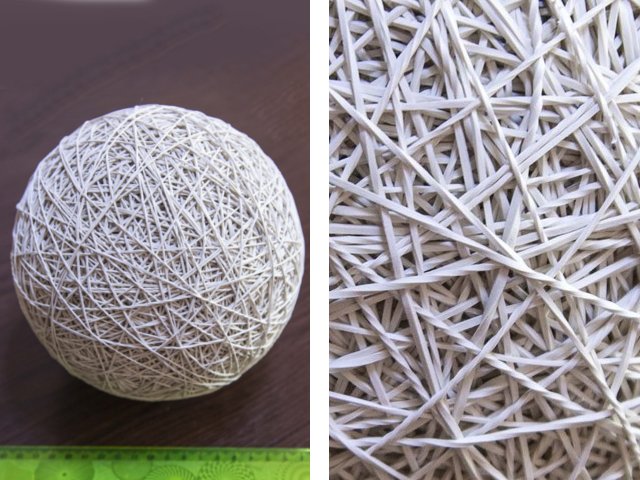
Such a simple figure like a ball is useful for playing with pets, for example. Let's take a closer look at how to make a beautiful rubber ball with your own hands without machine tools.
Materials for work:
- cotton pad / piece of cotton;
- 200-250 elastic bands of one or more matching colors.
Working process:
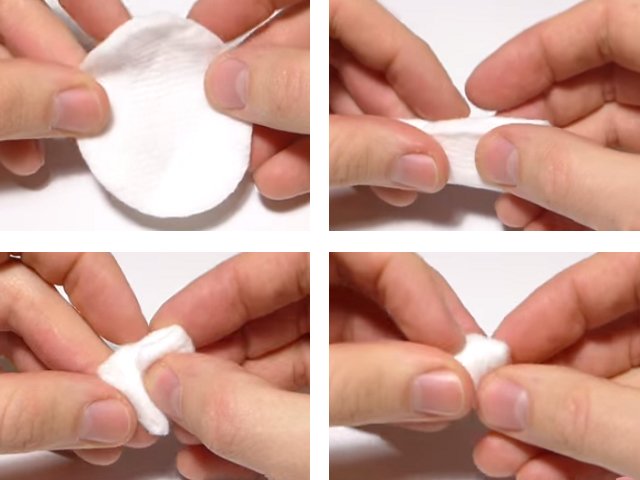
We bend the disk in half, and then again in half, crush the disk so that it looks like a ball.
We take the first rubber band, and wrap it around the disk three times, each time turning the middle with an eight. The result should be three rows. You also wrap the second in three rows, but already across the first elastic band - to make a cross.
All subsequent gum should try to place on the empty space of the cotton pad. We continue to wrap cotton wool with rubber bands.
In the process of weaving a springbok with your own hands from gum there is one trick:the greater the number of revolutions of one rubber band around the base, the more “jumping” it will be as a result. This means that it is worth tightening each rubber band more tightly so that it turns out to wrap more tightly.
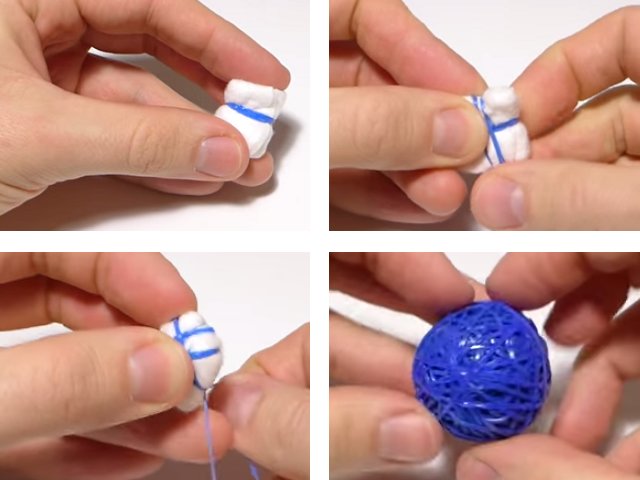
When the volume of the ball becomes large, gum can be worn without twisting. Thus, we continue to work until the stock of rubber bands is completed. It is important to remember that the process itself is quite long and time-consuming, however, this is a great way to get your hand in hand before starting work on more serious models of figures.
- Slingshot Banana Keychain
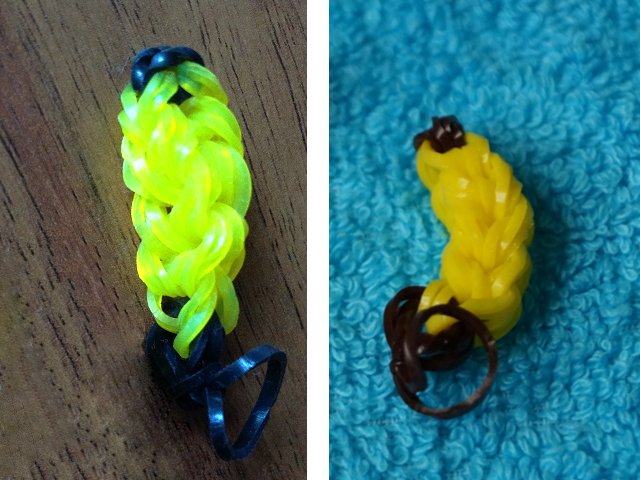
Another simple item that even beginners can relate to beginners. By the way, figures made of rubber bands in the form of fruits are very popular. Knitting them is easy and fun, and their biggest advantage is the ability to get a hand to weave more complex figures.
Materials for work:
- slingshot;
- a crochet hook or a plastic hook from a rainbow set;
- black rubber bands - 4 pcs.;
- yellow rubber bands - 20 pcs.
Working process:
Take the slingshot so that the recesses are facing you. Put the first rubber band in black on the right column as follows: it must be carefully wrapped around the column three times.
Next, put on two yellow rubber bands on the posts, without twisting them.
Now you need to take the hook and throw all three turns of black gum into the middle of the yellow gum already worn over it, according to the photos below.
On top you need to put on four yellow elastic bands again.
Carefully pick up the two lower loops on which there are already black rubber bands and transfer to the very top, throw over the slingshot columns and release so that they lie on top of all the rubber bands put on the slingshot.
Again we put on exactly four yellow elastic bands on the slingshot, as in step 4, so that they lie directly - one above the other.
We continue to throw off the gum with a hook, translating them through the columns of the frame. Exactly the same steps must be repeated exactly two more times to get the elongated body of our future toy.
The last time you need to limit yourself not to four, but to two yellow rubber bands, on which you need to wear the previous four.
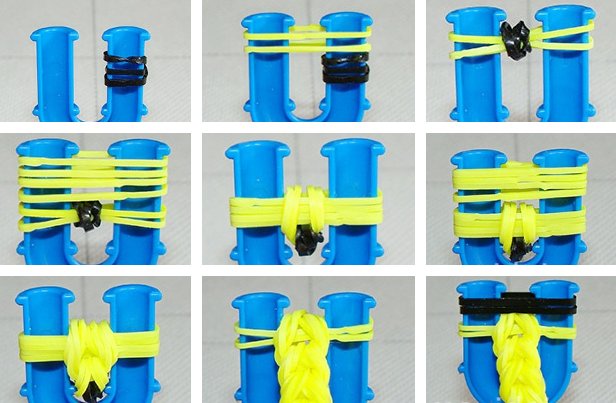
Next, you need to put on two black elastic bands on the slingshot.
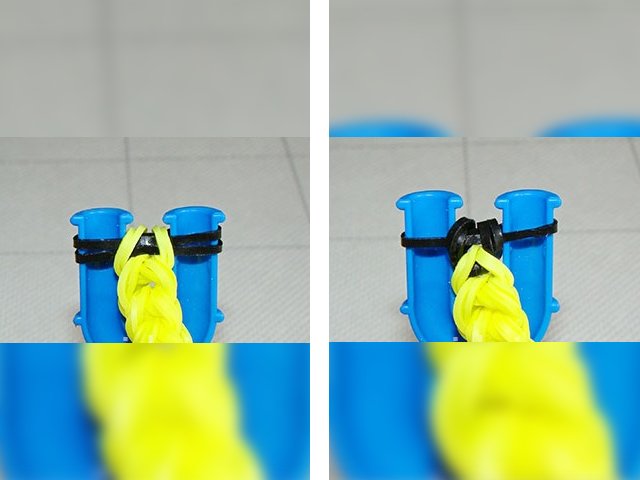
We throw off on the black or brown gum those same two yellow ones that were worn at the end of the weaving of the toy body.
It remains to throw on the frame one more, the latest gum in black, and then throw on it the two lower ones, and in order to fix the work. But first, we throw off both black loops of the same gum on one side of the slingshot. Then it remains only to stretch the lower loop, using the same hook through the upper one, and remove the toy from the mini-frame. The little gum banana is ready!
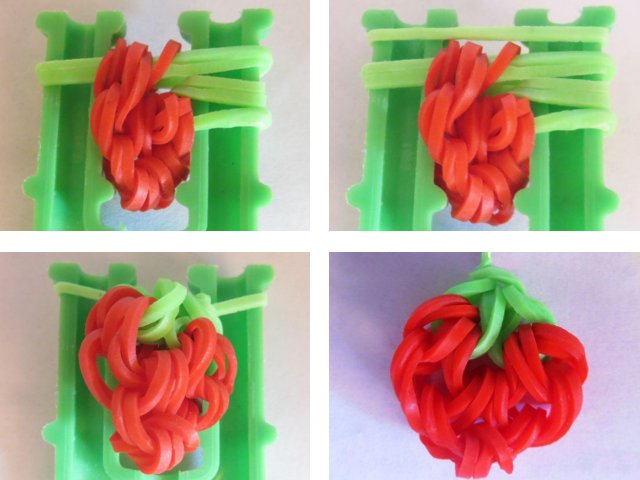
- Keychain Strawberry Slingshot
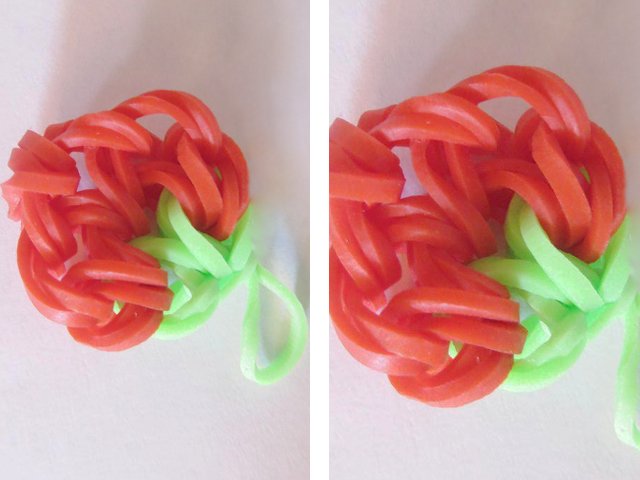
Children and adults who are just beginning to master the art of weaving from gum will really like the process of making different key chains in the form of bright fruits. That is why it is worth paying attention to such a funny figure as this strawberry.
Materials for work:
- slingshot;
- gum red;
- elastic bands of green color;
- hook.
Working process:
On the right side of the slingshot we put on a rubber band in red in three turns. We throw a double red rubber band on both pegs. We throw off the previous loops on it. Again we string two elastic bands.
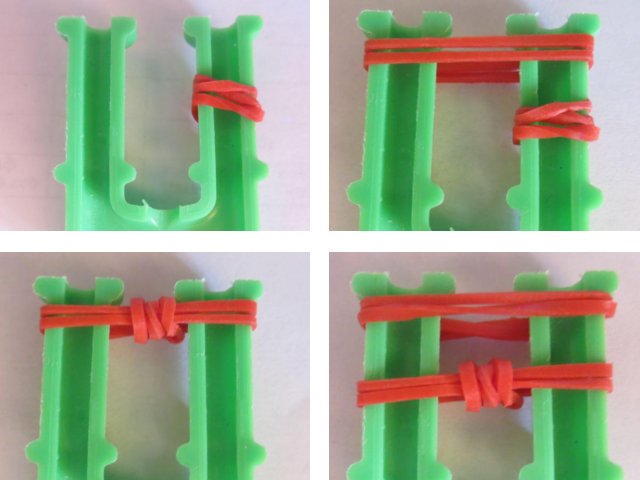
We fold the lower right loop to the center. Throw the left edge of the elastic to the right peg. String two red rubber bands. Remove the left loop.
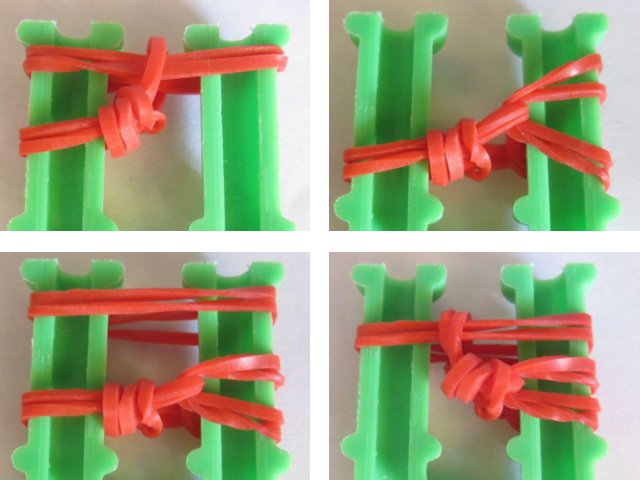
We repeat the previous steps: string two red elastic bands and remove the left loop. Remove the upper pair of loops from the right side of the slingshot and put it on the left. String a pair of red rubber bands. We throw off the upper right double elastic band in the middle.
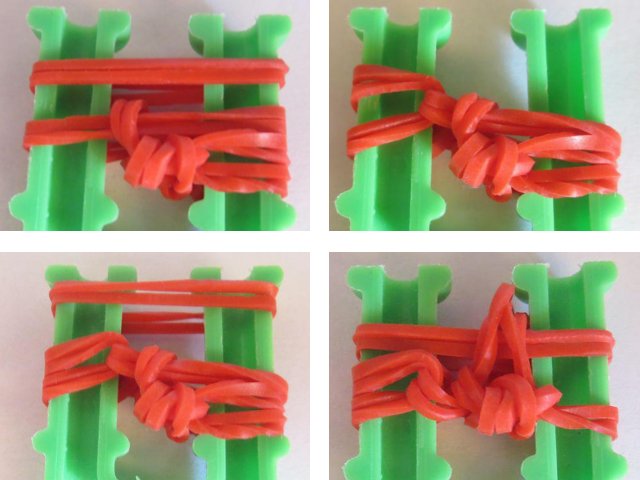
We put the top red loop on the left column. We put on a red elastic band and remove the loop on it from the right edge. Now we take a double elastic band of green color and put it on a slingshot. Remove the top red rubber band from the left edge to green.We put the left loop of green color on the right peg.
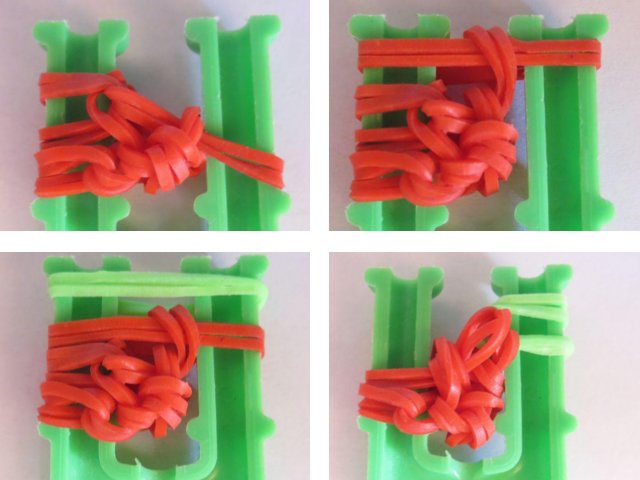
We put on a green pair. Remove all the loops located on the left side of the slingshot. We throw a single rubber band on both pegs. We remove all the green loops on it. Crochet carefully remove the two loops. Tighten the loop, throwing one gum on the other. A strawberry keychain is ready.
Weaving animals
Weaving animal gum can be considered a separate art form, as they can play the role of not just a toy or keychain, but also a fun decoration for pens or pencils. Weaving on a slingshot of animals is an entertaining process that captivates everyone without exception.
- Cute owl
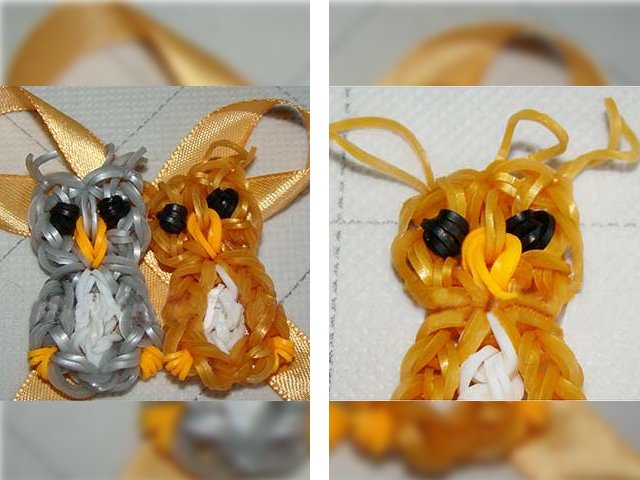
Let's try to weave such a cute symbol of knowledge from rubber bands using a slingshot. It will look great as a keychain or decoration on a cabinet handle.
Materials for work:
- slingshot;
- hook;
- scissors;
- golden gum - the main body color - 44 pcs.;
- white elastic bands - abdomen - 8 pcs.;
- orange gum - paws and beak - 4 pcs.;
- black elastic bands - eyes - 2 pcs.
Working process:
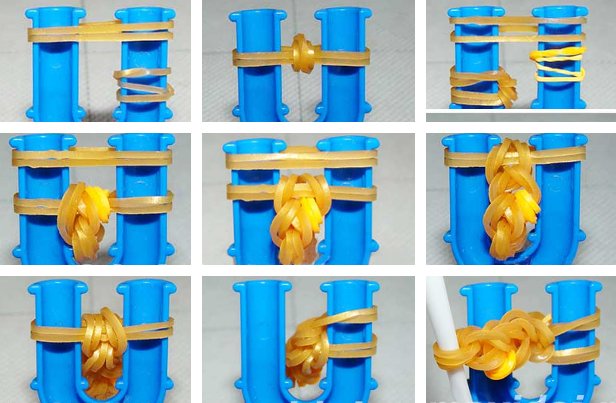
Weaving an owl will be performed in two stages. First, prepare the rubber bands in the form of a diagram for the body of an owl and weave it, and then move on to the head, as shown in the step-by-step photos below.
We start with the gold color. We throw the first gum in three turns on the right column. Then we put two red on two pins.
Throw the initial of three turns into the center.
Then free the right column, moving the gum to the left side.
Now make the owl’s foot. We wrap one orange gum four times on the right side of the slingshot. We put on two redheads usually.
The orange of the four revolutions is lowered to the gum. From the left column we send to the center the bottom two pairs so that the orange remains to the right of them.
Again we throw two redheads, and send the lower ones to the middle.
Then we put the second pair of red ones on two columns, and send the lower ones to them.
And we will throw the third pair on both parts of the slingshot, lower the lower ones to the center.
Move the rubber bands from the left to the right.
We introduce the hook into the initial gum of three turns and put it on the left column.
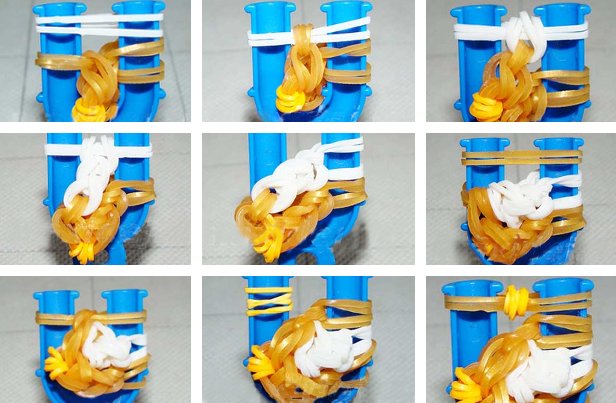
Now we will weave the belly of an owl from white gum. Having thrown the first two white elastic bands, we will send a triple elastic band in the middle.
We put on the second white pair in the same way as the previous one and lower the lower white ones from the columns.
We also weave the third and then the fourth pair of rubber bands.
Move the white gum on the left to the right.
Once again, insert the hook inside the initial triple gum and put it on the left pin.
Weaving with red rubber bands again. Put two on both columns.
Three turns to the left will be sent to the center.
Move the left rubber bands to the right, and wind 4 turns of the orange rubber band on the left pin.
We throw a couple more red ones and lower the orange from the pin.
From the right column, discard the two upper pairs of red ones so that the orange remains on the left.
We’ll put on two redheads and send the previous ones to the center.
Again we put on a couple of redheads and lower the previous ones from both columns.
We put on the next pair as well and discard the previous ones from the columns.
With the help of the next pair of red gum, we connect everything together i.e. putting a pair on both parts of the slingshot, we send all the lower gum from the slingshot to the middle of the weave.
Next, we turn to weaving the head of an owl. We will prepare the rubber bands, put it in the form of a diagram, as in the photo.
Having put on in the usual way a couple of redheads from the right row of the circuit, lower the lower ones in the middle.
Then we put on another pair, and the lower ones will be sent to the center again. Move the left elastic bands to the right.
Now we will make an owl’s eye. We will throw a black rubber band in four turns on the left pin.
Usually we put on a red-haired pair again and remove 4 black turns on it.
And also send both lower pairs on the right side, but so that the black one is on the left.
We will throw two more red gum, and send the lower ones to the middle.
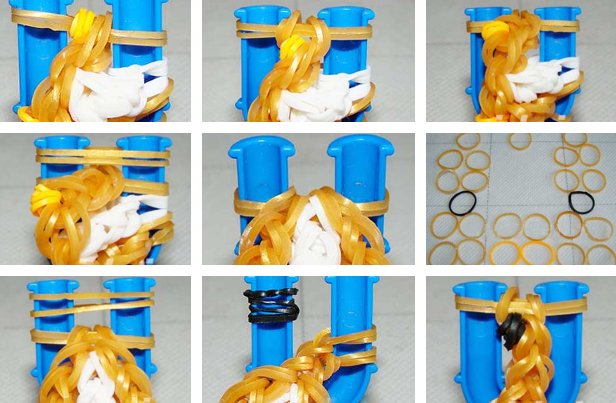
Free the left column by moving the gum from it to the right.
We introduce the hook into the loop with which we started weaving the head and put two orange on the hook. Pull through the loop and throw the second part on the hook.
And already from the hook we lower the orange to the left pin.
We put a pair of redheads on both columns and remove the orange rubber bands on them.
Transfer from the left side of the elastic to the right.
The hook is again inserted into the loop with which we started. We put a couple of red ones on the hook, pull one side, and put the second on the hook.
We lower the rubber bands from the hook to the left column.
Again on both columns we put on two red rubber bands. Two pairs of redheads on the left we lower to the center of weaving.
On the right column we cling to the upper two elastic bands and transfer to the left. We throw a black single rubber band in four turns on the right side of the slingshot.
We put a couple of red ones on both columns and lower the black turns.
Next, we discard from the left side of the slingshot all the rubber bands so that the black one is on their right.
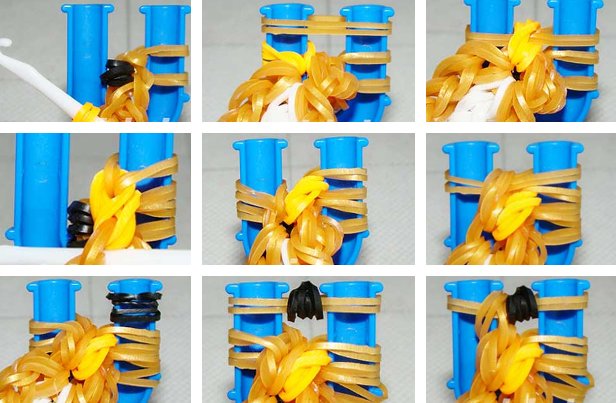
Continue with the red ones. Having put on a pair, the previous ones are sent to the middle.
Now we connect all the rubber bands on the slingshot. We put one red on two columns. We will send all the rubber bands from the slingshot to the center.
We transfer one of the elastic bands to the column next door. We lower the lower one to the center. Tighten the loop well.
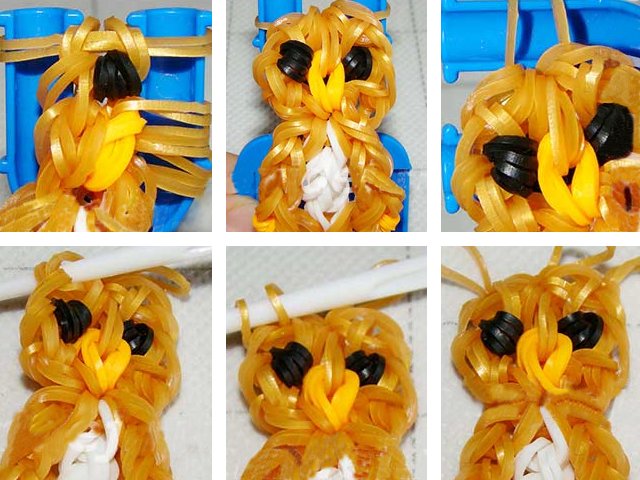
Now make the brush of our owl. We introduce the hook into the upper left eyelet of the head and extend one red through it.
Let's make a loop already known to you in a way.
Similarly, we do on the right side.
Now take the scissors and pulling each of the prepared gum, cut off about half. Owl made of rubber bands is ready.
- Bunny
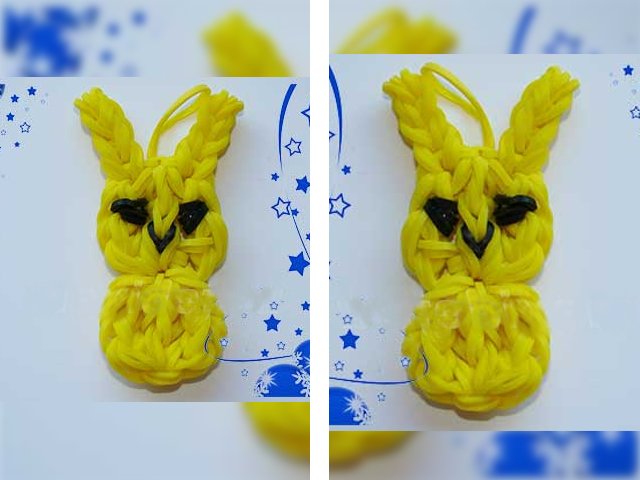
Another cool pet that can be worn with a bunch of keys. The bunny keychain will work if you follow the following instructions for weaving from gum.
Materials for work:
- slingshot;
- hook for weaving;
- yellow rubber bands - 58 pcs.;
- elastic bands in black - 3 pcs.
Working process:
We hold the slingshot in our hands with recesses in pins to ourselves, so that it would be comfortable to grab the rubber bands with a hook.
On the right side, we wind one yellow elastic band, wrapping it three times, and then we throw two on both pins.
We send the first rubber band (3 turns) to the middle and put on the next pair.
Now we lower the previous rubber bands to the center on both sides and throw another third pair on the posts.
We weave, having thrown off the lower ones, and then we put on the fourth pair of yellow ones.
Having thrown off the bottom ones again, we will transfer the workpiece to the right column, and we will introduce the hook into the triple initial gum.
We lower the triple from the hook to the left pin, and then we put on a couple more (this is the first pair of the next workpiece).
We lower the triple rubber band to the center on each side, and then we put on two more yellow rubber bands.
The previous ones are sent to the center from each side, and then we will throw two more yellow elastic bands.
Again, lower the lower (previous) rubber bands, and then transfer the second blank to the right side of the slingshot.
We find the triple rubber band and put it again on the left pin.
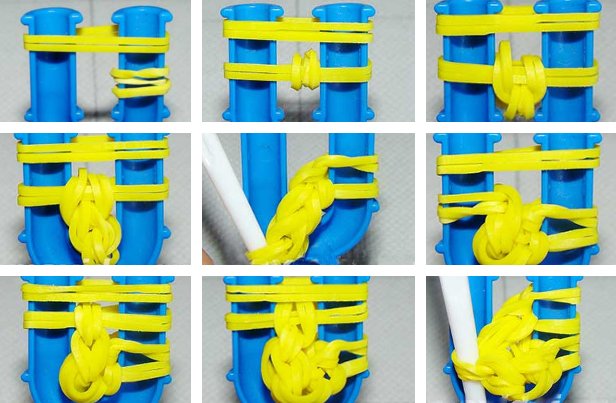
We do the next workpiece in the same way, weaving 4 pairs of elastic bands using the fishtail technique.
The bunny's body is almost ready, it remains only to connect the woven chains. To do this, put on two more yellow ones and send all the rubber bands on the slingshot to them.
Now we start weaving the bunny’s head. We’ll put on two yellow ones, and throw off the previous ones.
We’ll throw a couple more yellow on a slingshot. We drop the previous ones, and transfer the elastic bands on the left side to the right.
We make an eye to the bunny. On the left side of the slingshot we wrap one black one three times. And then we put two yellow ones on both columns.
We lower three turns of black on the left and both lower pairs of yellow on the right side, and then transfer the elastic to the left side.
Now weave the eye of the bunny of yellow rubber bands. We start by twisting the rubber band three times on the right column. And then we put the first pair on both columns.
We lower three turns to the center and continue with the “fish tail” to weave two more pairs of elastic bands.
We connect the elements, throwing a couple more yellow.Throw off all the lower rubber bands so that the eye is on the right.
We continue weaving the head. We introduce the hook into the loop with which weaving began and we put this loop on the left side of the slingshot.
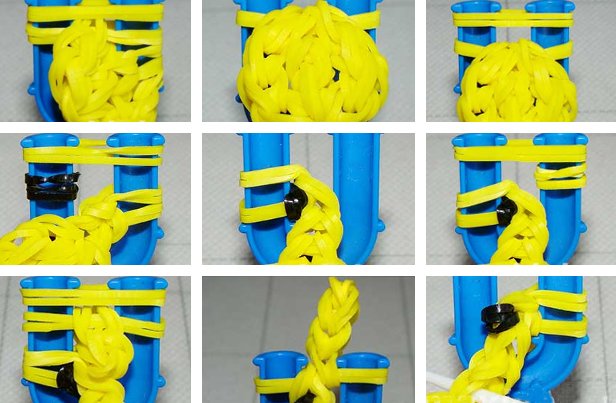
And then we throw a couple of yellow ones.
We lower the loop on the left.
Now we wind the black rubber band in 4 turns on the right column.
We put a couple of yellow on the slingshot.
We lower the black rubber and the previous yellow ones.
We will throw another pair of yellow rubber bands, and send the previous ones to the center on the left.
Move the gum to the right side.
We again hook the hook into a loop with which we began to make the bunny’s head and put it on the left pin.
We weave a pair of yellow “fish tail” and make the second eye.
We wind black on the right column, and then we throw a pair of yellow on the slingshot.
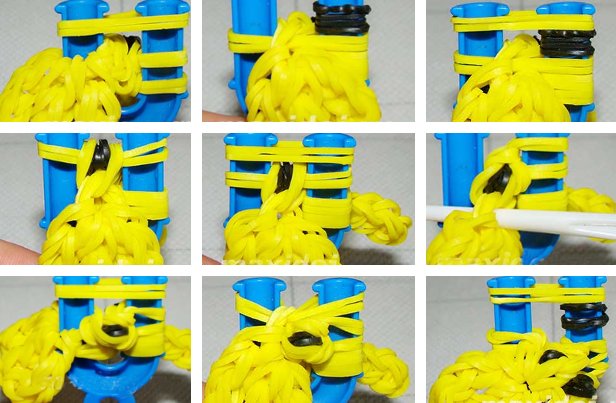
We lower the black turns and two pairs of yellow on the left side.
Put the left rubber bands on the right side and weave the second eye.
On the left side of the slingshot, we wind three times a yellow rubber band, and then weave in the same way as the first ear. We weave three pairs of elastic bands, and then connect the elements with the help of another worn pair of yellow.
We lower a pair of elastic bands on the left, and 3 pairs of upper yellow ones on the right.
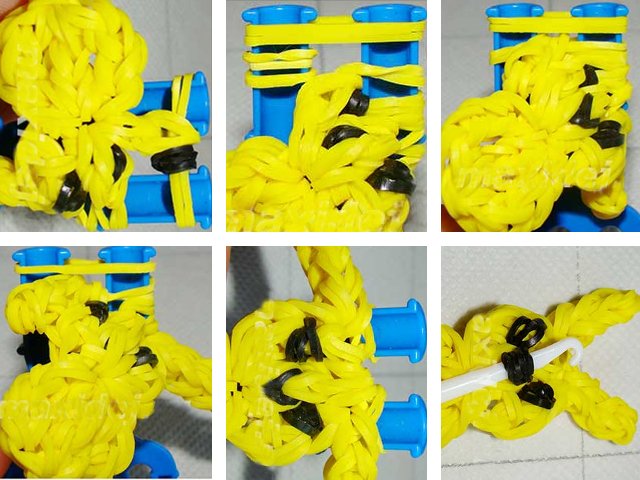
We throw the last single gum, on which we send all the lower gum from the slingshot. We transfer one of them to the next column, and then lower the lower one. We tighten the loop and remove the figure from the slingshot.
We fix the eyes, ears and pull out the nose evenly. Bunny is ready.
Video tutorial
It’s difficult, but interesting, maybe when creating figures from rubber bands using a slingshot! For example, if you choose such an interesting way of weaving a figure out of rubber bands, as shown in detail in this video tutorial. A master class in knitting another bunny figurine will help create a toy that children will like, and can also become a memorable gift for adults.
Video lesson - weaving from rubber bands figures on a slingshot:
How to weave figures from elastic bands on the machine
Weaving figures on the machine is a very exciting process, allowing to realize the most extraordinary and complex ideas of the masters of this type of needlework. The rainbow machine will help to make toys, things, accessories and much more out of simple rubber bands. But simple figures are obtained with the help of machines interesting and beautiful. For example, you can knit toys in different techniques - from simple weaving to lumigurumi, as well as interesting voluminous key chains made of elastic bands of different complexity. Let's look at some interesting examples in detail.
Keychains
Weaving trinkets from rubber bands is a very popular type of needlework among the younger generation. This is a simple and enjoyable way to make yourself and loved ones cute memorable things that they can always carry with them.
- Eiffel Tower
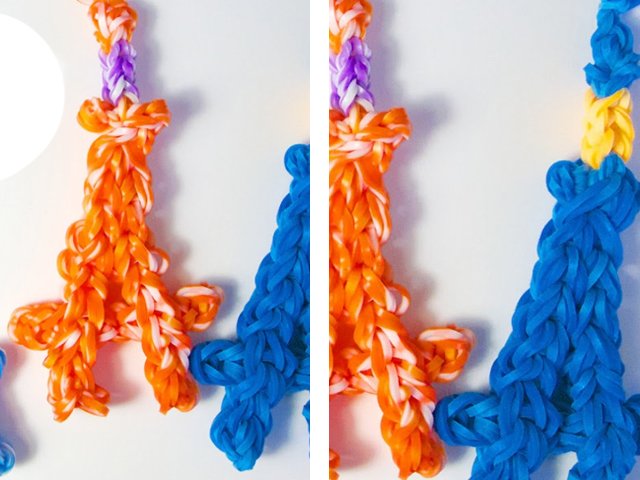
Let's try to weave such an uncomplicated tower in the shape of the letter A using a rainbow loom.
Materials for work:
- rubber bands of one or two colors - up to 40 pcs .;
- machine.
Working process:
We put the machine on the working surface, turning the notches away from us, and place the central row a little closer than the two extreme ones.
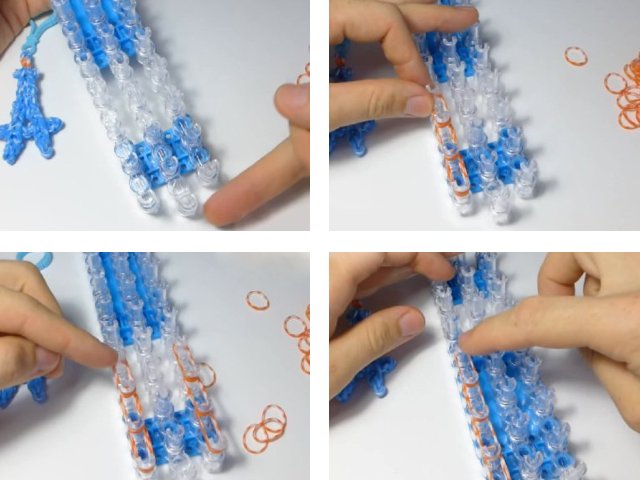
Important: each time we will throw three rubber bands at once. We need to throw three rings on the extreme rows three times, capturing four columns in each row. Next, you will need to use two rainbow loom pieces each time. Five pairs need to be thrown on the left extreme row, we will throw one more pair from the extreme to the central row. On the right side we will throw only three pairs of ringlets, after which we throw 2 more ringlets from the extreme to the central.
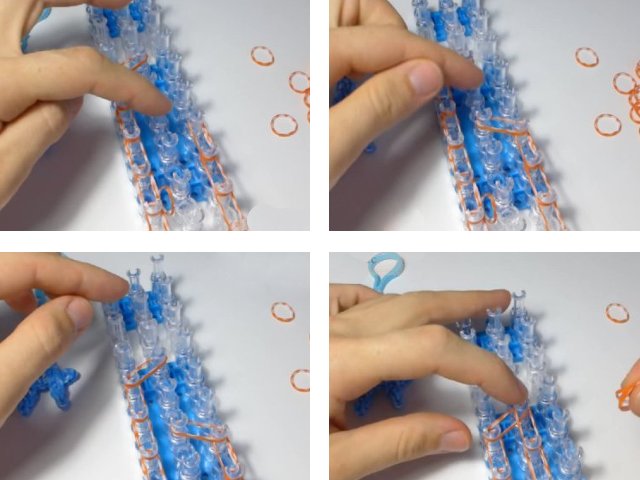
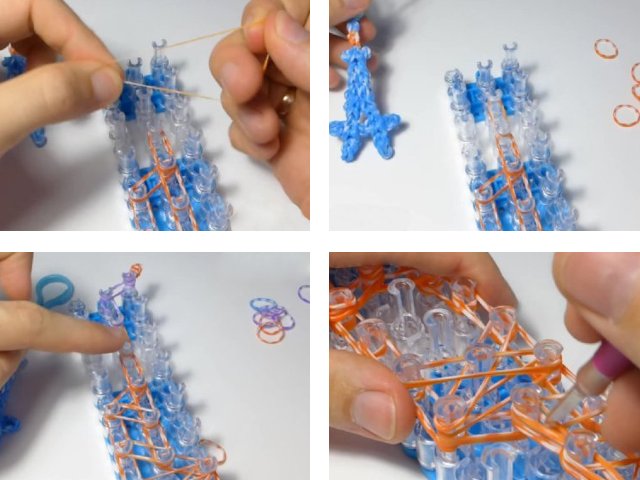
After that, you need to connect two pairs in the center row, then put on another couple in the center. Twist the next one ring in half and continue to center. We continue to master how to weave trinkets from rubber bands.
- Erysipelas
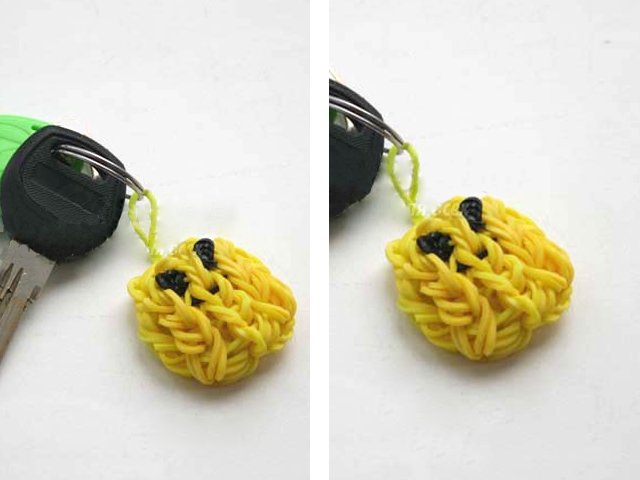
A simple volume figure with a good mood, which will decorate a set of keys.
Materials for work:
- yellow rubber bands;
- black rubber bands;
- machine;
- hook.
Working process:
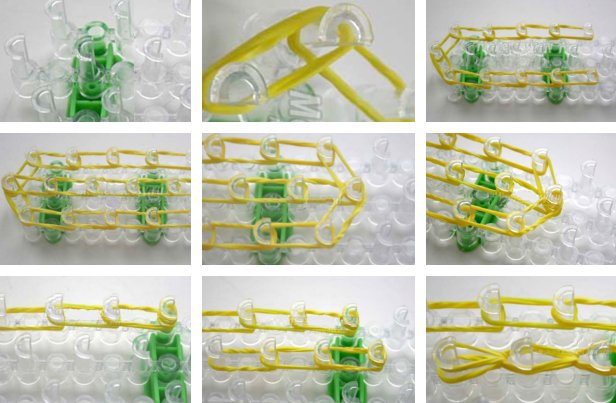
Take the machine tool.Arrange the rows so that the middle row is one column above the bottom and top.
Weave the emoticon with two rubber bands, that is, we put on the columns not one yellow rubber band, but two. So the product will be more durable. So, we put gum on the first column of the middle row, connecting it with the lower and upper row.
Add 4 pairs of elastic bands to the first and third row.
Then on the middle row - 5 pairs.
We connect all the rows with two pairs of elastic bands.
On the extreme column of the middle row (6 in a row) we wind the elastic in three layers. We prepared the basis.
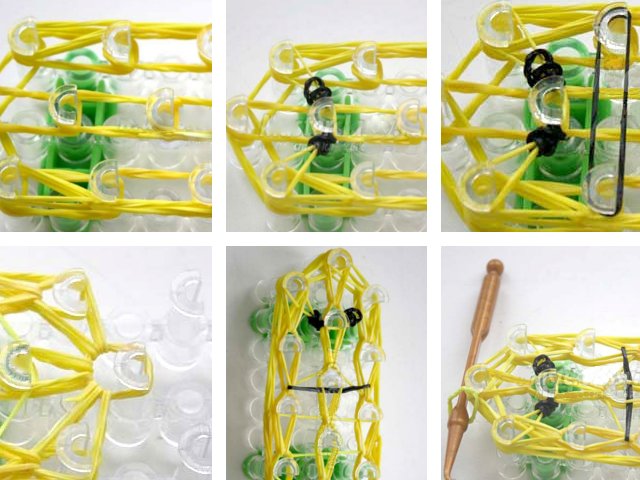
Now we need to make the smiley become rounded. To do this, take free columns on the machine. Put on four of them three pairs of yellow elastic bands. At the end, fasten with one rubber band. Duplicate.
We throw the rubber bands from the extreme column to the previous ones.
We remove the previously prepared stripes and dress them on 1 and 5 columns of the upper row. And the second workpiece for 1 and 5 columns of the lower row.
Now we begin to weave the eye. Take two black rubber bands. Wrap them around the hook three times.
Pass the eyes through the yellow rubber band, and throw on the first columns of the upper and lower rows.
Now a smile. Take another black gum. Throw it on the second columns.
Weave the upper and lower row.
Then the middle row.
We fix the product with a loop.
Carefully remove the emoticon from the machine. The elastic keychain is ready.
Lumigurumi video tutorials
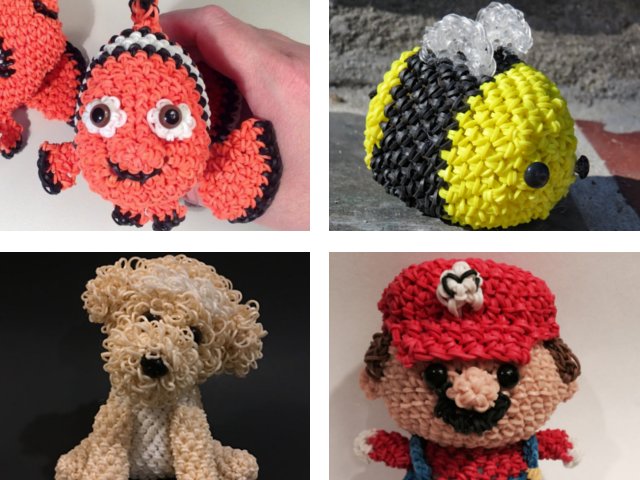
An interesting name for this method of knitting implies the possibility of weaving toys from rubber bands in a special way similar in specificity to Japanese amigurumi - knitting toys with knitting needles or crochet.
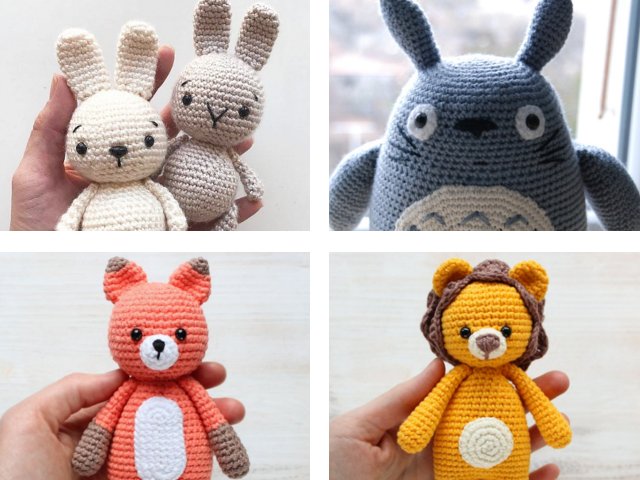
Crocheted figures of lumigurumi gum also turn out to be voluminous, and the canvas as a result remains dense, ribbed and structural - an excellent "development" for the fingers of very young children! If weave figures in this style on the machine, then the result is less voluminous objects that can not be stuffed with syntepon - everything will depend on the selected workshop.
A way to weave a beloved minion from rubber bands using the lumigrumi technique on a rainbow loom:
Detailed instructions for knitting a volume elephant from rubber bands on the machine:
The sweetest voluminous figures of rabbits, which are obtained from rubber bands using a machine:
Some people like to weave not figures, but flatmurals with silhouettes of figures. This knitting method shown on the video is suitable for them:
Here is a great a way to weave a voluminous beautiful owl,with one hook only. A detailed video lesson will help even craftsmen and craftsmen with little experience in weaving to cope with the task.
Another one crochet lumigrumi, this time a funny unicorn:
Monster High style video tutorial
Very popular among young people is weaving from gum in the style of Monster High. Often we are talking about weaving bracelets in the style of the cartoon Monster High. But you can also often find instructions for knitting certain items of clothing in the style of the main characters of the cartoon, which are suitable for dolls. Some masters even weave from the gum of the heroines themselves. Weaving of elastic bands on the machine tool figures in the style of "monsters" is usually performed in dark and bright contrasting colors.
Video lesson - figures of rubber bands on a machine in the style of Monster High:
Here is another master class on knitting from elastic bands on the machine of another cartoon figure:


