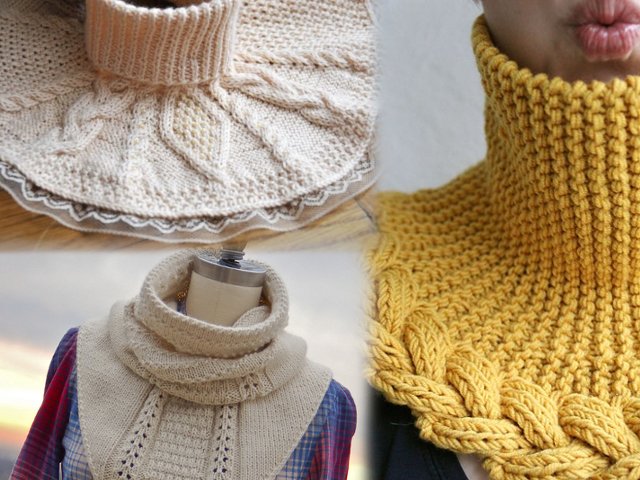
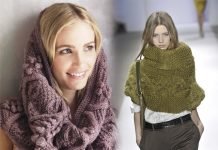
Another variety of a small but useful product that you can create with your own hands is a shirt shirt. The neckline connected by knitting needles and covering the neckline is still quite a popular thing, because it is often used in everyday life in the cold season. This product from warm yarn perfectly protects the throat from snow, wind and frost, and saves many people from illnesses.
Schemes and description of knitting a shirt front with knitting needles
In addition to their obvious benefits, shirts can also be very beautiful, and they have a huge variety of varieties: children’s, for men, for women, with fasteners, buttons, knitted with elastic, raglan, with yoke, with delicate patterns and strict classical ones.
Consider several possible options for knitting shirt-fronts with patterns and descriptions that are suitable for both beginner needlewomen and experienced knitters. But first, consider how to knit a simple shirt-front with knitting needles - The scheme and description for beginners will help in this.
Step-by-step instruction for beginners

Before starting to knit a warm collar, beginners need to familiarize themselves with several important rules:
- Knitted sweatshirt should consist of dense canvasto keep the original form as long as possible;
- Knitting needles in this case is better to choose half size thinner the yarn itself, and the yarn should be made of natural compound with a small amount of synthetic impurities;
- When choosing a shirt-front without buttons and fasteners, you should remember that the thing fits starting at the neck;
- Calculate the number of loops needed for the shirt front You can: measure the circumference of the neck; measure the density of the canvas; add two centimeters to the sum. Thus, the knitted product will fit freely to the neck;
- Sometimes the edges of the shirt front are processed crochet so that they do not wrap, applying double crochet.
And now you can take a closer look at how to knit the shirt front with knitting needles - step-by-step instructions will help with this. Take for example a simple model of a shirt-front for a woman who is knitted with raglan.

Instruments:
- yarn made of wool and acrylic;
- circular knitting needles No. 4,5;
- centimeter.
Working process:
First, we knit a product sample with a simple rubber band, we collect twenty loops, of which fifteen strips are knitted. After that, the volume of the head is measured and further calculations are carried out. After that, the workpiece is stretched horizontally.
In order for the neck to be freely put on and removed without deformation, the classic version involves stretching the shirt front by 50 cm. Thus, the number of loops should be around 60 pieces. Raglan knitting implies the number of loops is a multiple of four, so we add eight more loops. Ragged loops are best marked with markers, with bright threads or pins according to this pattern:

68 loops are gathered on the knitting needles and the pattern is knitted with a simple elastic band to the height you need (about 15 cm). After that, you can go to the expanding part of the shirt-front.
For the first row, you need to connect two loops in the wrong way, and ten pieces in the front. Continue in this sequence to knit until the end of this circle.
For the next row, make one double crochet before the wrong side, then two out. loops, again yarn thread, and then knit 10 faces. n. Repeat such manipulations to the very end of the strip.
The third line begins with a yarn, which is knitted with a front loop over the back wall. Knit with needles so that holes do not form during operation.
Further, the product should consist of such rapports, which are described in the scheme: persons. n. from the sketch, which was in the previous lane, then two wrong sides, again the yarn, which is performed by a person and 10 persons. n. Repeat this until the very end. As a result, you should get in this row 2 out. p. and 12 persons. P.
After this, repeat the second and third row until the product reaches the desired length (about 20 cm). At the very end, all remaining loops are closed in a circle crochet (methods for crocheting the edges can be seen here), and the threads are tucked in. Manishka is ready. In more detail, the knitting process is shown in the video at the end of the article.

Simple model for a child
Of course, shirt-fronts can be not only for adults, but also for children. Moreover, warm collars are knitted with needles, even for the smallest. Children's shirt shirt is easy to use and lack of a high neck. A simple shirt-front with knitting needles is knitted with soft yarn, which will not irritate the baby's delicate skin. Let's consider in more detail how to knit a shirt front with knitting needles for a child - in this case, for a baby up to a year.

The size:3 (6) 8 months.
Instruments:
- yarn (100% sheep’s wool; 100 m / 50 g) - 50 g of pale pink;
- knitting needles No. 4;
- 3 (3) 4 mother of pearl buttons.
Patterns for a baby shirt shirt
Shawl binding:front and back rows to knit facial.
Border with pico on 4 loops:
1st and 2nd p.: knit with a garter stitch;
3rd r.: 2 p. Knit together the front, 1 yarn, from the next 2 loops, knit 2 p.
4th p.: 1 p. Remove, as a face, 1 person. and stretch through it a removed loop, 1 person. and stretch the 1st loop through the 2nd, 1 persons.
1st – 4th ranks constantly repeat.
Openwork pattern
1st p. (= out of p.): * 2 p. knit together front, 1 yarn *. From * to * constantly repeat, finish 1 facial.
2nd p. (= persons. R.): knit all loops and crochets.
Knitting density
21 p. X 42 p. = 10 x 10 cm, knitted with a garter stitch.
Working process
Spread 16 (22) 30 p.p. and knit as follows: 4 p. Rim with pico, attach a marker, 11 (17) 25 p. Garter stitch, hem.
After 2 cm from the initial row, connect 2 r between the edge and marker. openwork pattern.
Then again continue to knit with a garter stitch, but in shortened rows as follows: * knit 6 (10) 16 p. After the marker, turn, knit all the loops, turn, knit 10 (14) 20 p. After the marker, turn, knit all the loops, turn, 2 p. knit all the loops, knit 10 (14) 20 p. after the marker, turn, knit all the loops, turn, 2 p. knit all loops *. From * to * (= 10 p.) Constantly repeat and at the same time every 5 cm repeat the openwork pattern (measured in the narrowest place).
After 17 (22) 22 cm from the initial row (in the narrowest place) after the openwork pattern, knit 2 cm with a garter stitch (without shortened rows), and after 2 p. evenly make 3 (3) 4 holes for buttons - 2 p. knit together front, 1 yarn. Close all loops.
Assembly
Moisten the front plate, stretch and allow to dry. Sew on buttons.
Universal knit for children
A beautiful knitted shirtfront with knitting needles is easier than it seems, you just need to use the simple way of knitting the neck, which will look great both on the boy and on the girl. The shirt-front for children with knitting needles knits quickly and easily, you just need to use the correct instructions.

Instruments:
- skein of yarn 100 g;
- circular knitting needles No. 3 (you can start on toe knitting needles, and then switch to circular knitting needles).
Working process:
We collect 92 loops on the knitting needles and knit 48-50 rows in a circle with an elastic band 1 * 1 or 2 * 2.Next, we divide all the loops into 4 (mark these places with either markers or threads of a contrasting color) here we will make extensions, and we will get 4 wedges. It turns out 23 loops.
Now we knit like this: (repeat from * to *)
1 row - * from 1 liter we knit 2 people., 19 people, from 1 people we knit 2 people, 1 people, 1 out *
2 row and all even ones (up to 32 rows) - we knit the front ones, we purl the wrong ones; we don’t make additions.
3 row — — * from 1 persons we knit 2 persons., 21 persons; from 1 persons we knit 2 persons, 1 persons, 1 out *
5 row - * from 1 persons we knit 2 persons., 23 persons, from 1 persons we knit 2 persons, 1 persons, 1 out *
7 row - * from 1 persons we knit 2 persons., 25 persons, from 1 persons we knit 2 persons, 1 persons, 1 out *
9 row - * from 1 persons we knit 2 persons., 27 persons, from 1 persons we knit 2 persons, 1 persons, 1 out *
11 row - * from 1 persons we knit 2 persons., 29 persons, from 1 persons we knit 2 persons, 1 persons, 1 out *
13 row - * from 1 persons we knit 2 persons., 31 persons, from 1 persons we knit 2 persons, 1 persons, 1 out *
15 row - * from 1 persons we knit 2 persons., 33 persons, from 1 persons we knit 2 persons, 1 persons, 1 out *
17 row - * from 1 persons we knit 2 persons., 35 persons, from 1 persons we knit 2 persons, 1 persons, 1 out *
19 row - * of 1 person we knit 2 people., 37 people, of 1 people we knit 2 people, 1 people, 1 out *
21 row - * of 1 person we knit 2 people., 39 people, of 1 people we knit 2 people, 1 people, 1 out *
23 row - * from 1 persons we knit 2 persons., 41 persons, from 1 persons we knit 2 persons, 1 persons, 1 out *
25 row - * of 1 person we knit 2 people., 43 people, of 1 people we knit 2 people, 1 people, 1 out *
27 row - * from 1 persons we knit 2 persons., 45 persons, from 1 persons we knit 2 persons, 1 persons, 1 out *
29 row - * of 1 person we knit 2 people., 47 people, of 1 people we knit 2 people, 1 people, 1 out *
31 row - * of 1 person we knit 2 people., 49 people, of 1 people we knit 2 people, 1 people, 1 out *
32 row - * 1 persons, 52 out of 1, 1 persons, 1 out *
33 row - * from 1 liter we knit 2 people., 51 people, from 1 people we knit 2 people, 1 people, 1 out *
34 row - * 1 persons, 54 out of 1, 1 persons, 1 out *
35 row - * from 1 persons we knit 2 persons., 53 persons, from 1 persons we knit 2 persons, 1 persons, 1 out *
36 row - * 1 persons, 56 out of 1, 1 persons, 1 out *
37 row - close all loops. Manishka is ready.

Knitting an openwork shirt for a girl
In the cold season there are no more beautiful things than knitted warming products. Not all children like scarves, so shirt-fronts come to the rescue. It is the shirt front with knitting needles for the girl that can turn out to be a real decoration: patterns, braids, voluminous floral motifs - the scope for creative imagination is endless. Knitting a shirt front with knitting needles will be a pleasure for the needlewoman, if you pick up an interesting knitting pattern for an openwork product.

Instruments:
For large size
- yarn (70% acrylic. 30% angora, 300 meters per 100 grams) - 1 skein;
- double-sided knitting needles No. 1,5;
- double-sided and circular knitting needles No. 2;
- hook number 2.
For small size
- yarn (75% acrylic, 25% wool, 130 meters per 50 grams) - 2-3 skeins;
- double-sided knitting needles No. 2.5;
- bilateral and circular spirits No. 3,5,
- hook number 3.5.
Broach: perform it by removing the loop, 1 l. p., we roll the shot on the knitted = 2 p. l behind the back wall.
2 p. Instead of facial: start the right joint venture. in the second chain, and then - in the first on the left sp., 2 p.m. L., we throw the removed loop on the already knitted.
Double decrease: remove the loop, 2 p.m. L., we throw the removed loop on the already knitted.
Knitting pattern for openwork shirtless

Working process:
With double-sided smaller knitting needles, knit the number of strings, a multiple of 4 - in our case, 90, we distribute them evenly over 4 sts. and connect in a circle. Then we knit the elastic pattern in a circle 2 x 2 about 14 cm, change the joint venture. to a larger size.
Now we should knit one row of L. p., at the same time adding loops in this row to get a total of 105 p.
- We continue knitting according to the scheme, when it becomes inconvenient to work with these cn., Change them to circular ones:
1 p.: * broach, 2 l. p., 2 p. l., yarn, 1 l. n. behind the back walls., yarn, broach, 2 l. p., 2 p. l., yarn, 2 p.v. l., yarn, from *. - 2 p. and all are even: l P..
- 3 p.: * broach, 2 l. n., double crochet, 1 l. n., double crochet, 1 l. n. behind the back walls., yarn, 1 l. n., double crochet, 2 l. p., 2 p. l., n., double decrease, n., from *.
- 5 p.: * broach, 2 l. n., inc., 2 l. n., nak., 1 l. n. behind the rear walls., nak., 2 l. n., inc., 2 l. p., 2 p. l., nak., double decrease, nak., from *.
- 7 p.: * decrease to the left, 2 l. n., inc., 3 l. n., nak., 1 l. n. behind the back walls., nak., 3 l. n., n., 2 l. p., 2 p. l., n., double decrease, n., from *.
- 9 p.: * prot., 2 l. n., n., 4 l. p., n., 1 l. n. for the rear. walls., n., 4 l. n., n., 2 l. p., 2 p. l., n., double decrease, n., from *.
- 11 p.: * prot., 2 l. p., n., prot., 7 l. p., 2 p. l., n., 2 l. p., 2 p. l., n., dv. kill., n., from *.
- 13 p.: * prot., 2 l. p., n., prot., 5 l. p., 2 p. l., n., 2 l. p., 2 p. l., n., dv. kill., n., from *.
- 15 p.: * prot., 2 l. item, n., etc., 3 l. p., 2 p. l., n., 2 l.p., 2 p. l., n., 3 l. n., n., from *.
- 17 p.: * ave., 2 l. item, n., etc., 1 l. p., 2 p. l., n., 2 l. p., 2 p. l., n., 1 l. n. for the rear. walls., n., dv. kill., n., 1 l. n. for the rear. walls., n., from *.
- 19 p.: * ave., 2 l. p., n., dv. kill., n., 2 l. p., 2 p. l., n., 3 l. p., n., 1 l. n. for s. walls., n., 3 l. n., n., from *.
- 21 p.: * ave., 5 l. p., 2 p. l., n., 1 l. n. for s. Art., n., dv. kill., n., 3 l. p., n., dv. kill., n., 1 l. n. for s. Art., n., from *.
- 23 p.: * ave., 3 l. p., 2 p. l., n., 3 l. n., n., 2 l. p., n., dv. kill., n., 2 l. p., n., 3 l. n., n., from *.
- 25 p.: * ave., 1 l. p., 2 p. l., n., 1 l. n. for s. Art., n., dv. kill., n., 3 l. p., n., 3 l. p., n., 3 l. p., n., dv. kill., n., 1 l. n. for s. Art., n., from *.
- 27 p.: * dv. kill., n., 3 l. p., n., 1 l. n. for s. Art., n., 1 l. n., (n., dv. ub., n., 1 l.p.) x 3, n., 1 l. n. for s. Art., n., 3 l. n., n., from *.
Close all the loops without cutting the thread = 1 p., Transfer it to the hook.
Product tying
* (Column without n., 3 air loops, 1 column) in the first step, skip 0.5-1 cm, repeat from * and end with a connecting column. We wrap the collar, if desired, it can also be hemmed. Hiding the ends on the wrong side. To openwork shirtfront lay down beautifully, it must be carefully steamed.

Description of knitting patterns for a boy
If with girls everything is clear - flowers and braids, then shirt-fronts for boys fit in a more strict, classic look. In this matter, the following scheme and description of knitting a shirt front for a boy with knitting needles will come in handy.

Workflow with step by step photos
Distribute 60 loops evenly over the head volume of 50 cm into 4 knitting needles. Next, knit a gum pattern (alternating 1 front and 1 wrong) 17 rows.

If desired, you can tie the neck and authentic. 17 next we finish knitting elastic, 18 rows will go only the front surface.

From the 19th row, we begin to count raglan - these are 4 lines that go from the neck to the armpits. The raglan line can be one loop, two, or a pigtail. In this master class, it consists of 4 loops (60-4 = 56). We divide these 56 loops into the back and front (17 loops each), and into the sleeves (11 loops each). Then we knit according to this scheme:
- before 17 loops with the front surface and denote with another thread the raglan loop;
- 11 loops of the sleeve and mark the raglan loop;
- 17 loops before the front surface, ragged loop;
- 11 loops of the other sleeve.
It turned out 19 row (photo 1).
In the 20th row we knit 17 front loops, add a loop from the broach. Next, we knit the front loop of the raglan and also add the loop from the broach. We continue 11 loops of the sleeve, add one loop, knit 1 front, add a loop. 17 loops of the back, increase, 1 front, increase. 11 loops of the second sleeve, we add a loop, we knit 1 front, and again we add a loop. Thus, we will expand the shirt-front.
Starting from 21 rows and in all odd rows, we knit without changes.
From 22 rows, including all even rows, we make ragl additions. We knit until the length of the sleeve is 6 cm. As a result, 36 knitted rows are obtained.
In the 37th row, we knit the loops of the front of the back and raglan with the front stitch, and the loops of the sleeves are knitted on the wrong side.
In the 38th row, we close the sleeves with front loops (photo 2).

Further, we continue to knit only in front, and then the back. To do this, in the 39th row, we knit the first 2 and last 2 loops with the wrong ones, and the middle ones with the facial loops.
In the 40th row we knit everything according to the drawing.
In row 41, we make two loops together wrong side, one wrong side, middle loops we knit with front stitch, 1 wrong side, 2 loops wrong side.
In 42 row we knit according to the picture. So we knit to 56 rows, our front will gradually narrow.
With 56 rows, we decrease not only on the front side, but also on the wrong side too.
In the 60th row, 10 stitches will remain on the knitting needles. We knit two loops together of faces, we knit 6 facial, two loops of faces.
In the 61th row (on the inside) we close all the loops with the front ones.
Similarly, in front we knit the back. You can adjust the length of the front and back.
The finished shirt shirt is crocheted with crochet and crochet step. The dummy for the boy is ready.
How to tie a beautiful model for a woman

So unusualThe shirt front for a woman with knitting needles is very useful in the offseason, when it is not too cool, and you only need to cover your shoulders. This is more of a decorative knitted thing than clothing that saves from the cold, but on women and girls this model looks very impressive.Let's consider in more detail how to knit a shirt front with knitting needles with beautiful volumetric braids.
Instruments:
- yarn (100% wool, 94 meters per 100 grams) - 5-6 skeins;
- knitting needles 11 mm, length - 60 cm.
Description is offered for two sizes: S / M (L / XL).
Knitting patterns:
Braid with a slope to the right: sn. 3 pp. cn for braids behind the canvas, 3 l. p., then 34 liters. items with add. sp ..
Left braid: sn. 3 pp. cn for braids in front of the canvas, 3 l. p., then 3 l. item with add. sp ..
Broach: sn. n. as l., 1 l. item, throw the shot item on knitted.
Working process
Bottom part
We collect 31 p., Then follow the description below.
1 p. and all the odd pp. we knit according to the scheme: 4 and. n., 2 l. p. 6 and. p., 1 l. p., 1 and. n. for s. Art., 1 l. p. 6 and. n., 2 l. p. 2 and. n., 2 l. p. 4 and. P..
2, 4, 8 pp. (HP): 4 l. p. 2 and. p., 2 p. l., n., 2 and. n., 6 l. p., 1 and. p., 1 l. n. for s. Art., 1 and. n., 6 l. p. 2 and. n., 4 l. P..
6 p.: 4 l p. 2 and. p., 2 p. l., n., 2 and. n., braid with an inclination to the right, 1 and. p., 1 l. n. for s. Article .. 1 and. n., braid with an inclination to the left, 2 and. n., 4 l. P..
We alternate 1-8 pp. until the workpiece reaches a length of 120 (140) cm, close everything and sew.
Top part
From the front side along the sidewall we evenly dial 133 (152) p., Now you need to knit in a circle without turns.
- 1 p.: l P..
- 2 p.: * 1 and. n., 6 l. p., 1 and. n., n., 4 l. p., 3 p. l., 4 l. n., n., from *.
- 3 and all the odd pp. tie according to the scheme: l. p., crochet knit like. P..
- 4 p.: * 1 and. n., 6 l. p., 1 and. p., 1 l. p., n., 3 l. p., 3 p. l., 3 l. p., n., 1 l. sweat *.
- 6 p.: * 1 and. n., braid with an inclination to the left, 1 and. n., 2 l. n., n., 2 l. p., 3 p. l., 2 l. n., n., 2 l. sweat *.
- 8 p.: * 1 and. n., 6 l. p., 1 and. p., 3 l. p., n., 1 l. p., 3 p. l., 1 l. p., n., 3 l. sweat *.
- 10 p.: * 1 and. n., 6 l. p., 1 and. n., 4 l. p., n., 3 p. l., n., 4 l. sweat *.
- 12 p.: * 1 and. n., 6 l. p., 1 and. n., n., 2 l. p., ave., 3 p. l., 2 p. l., 2 l. n., n., from * = 119 (136) n.
- 14 p.: * 1 and. p., braid with incl. ow., 1 and. p., 1 l. n., n., 2 l. p., 3 p. l., 2 l. p., n., 1 l. sweat *.
- 16 p.: * 1 and. n., 6 l. p., 1 and. n., 2 l. p., n., 1 l. p., 3 p. l., 1 l. n., n., 2 l. sweat *.
- 18 p.: * 1 and. n., 6 l. p., 1 and. p., 3 l. p., n., 3 p. l., n., 3 l. sweat *.
- 20 p.: * 1 and. n., 6 l. p., 1 and. p., n., 1 l. p., ave., 3 p. l., 2 p. l., 1 l. p., n., from * = 105 (120) p.
- 22 p.: * 1 and. p., braid with incl. ow., 1 and. p., 1 l. p., n., 1 l. p., 3 p. l., 1 l. p., n., 1 l. sweat *.
- 24 p.: * 1 and. n., 6 l. p., 1 and. n., 2 l. p., n., 3 p. l., n., 2 l. sweat *.
- 26 p.: * 1 and. n., 6 l. p., 1 and. p., ave., 3 p. l., 2 p. l., from * = 91 (104) p.
- 27 p.: we knit like unpaired pp ..
Then you need to knit 1 p. l p., we reduce 13 (20) p. along it = 78 (84) p.
Tie another row: * 3 l. p. 3 and. sweat *.
2 more p. 3x3 elastic band pattern.
Next row: we knit a 36 p. Elastic pattern, turn and now continue knitting back and forth, not in a circle.
Add 3 p. At the beginning of the row and end with a 3x3 elastic band. We continue to knit a 3x3 elastic band for another 18 cm, close the stitches and sew the 3 stitches typed to the neck from the inside. The t-shirt before the toe should be steamed.
Manishka for a man

Manishki look great on men. And being a caring spouse or girl, mom or sister, you should definitely knit this simple product with knitting needles that will protect the neck and neck of an expensive man in cold winter.
So, we will consider a simple option of how to knit a shirt for a man - a master class will help in this. This model is knitted in two separate parts, and then stitched. Therefore, this option is perfect for knitters with little experience. The calculations of this product are ideal for size 50-52.
Instruments:
- Unity Light black yarn (48% wool, 52% acrylic, 200 meters per 100 grams) - 1 skein;
- yarn for decoration in strips of light gray color Unity Light (48% wool, 52% acrylic, 200 m per 100 grams) - about 30 grams;
- five circular knitting needles No. 4.
Working process
We start knitting with the neck of the product: we use 2 circular knits., We collect 88 loops (you can change the number of loops, but their number must be a multiple of four).
We take out one of the joint ventures. and knit it with 28 p. 2x2 elastic, release this joint venture. and take another one, we also knit it with an “elastic band" 28 p., omit the third circular joint venture. we knit the remaining 32 stitches with the same rubber band.
We connect all the loops in a circle, then we need to knit 36 rows with a 2x2 elastic band. The neck is ready.

Now go to the front surface. We transfer our canvas to 4 sp., Instead of three. We carry out increases.
The first joint venture: 1 l. p., 1 app. from prot., tie 20 liters. p., 1 app. from prot., 1 l. P..
The second, third and fourth are the same.
We knitted 88 stitches with needles and added 8 additional stitches. We need to knit another 13 rows in this way with black thread with the front stitch, adding 8 stitches in each second row, as described earlier.
Further, as was said above, the first row: 1 l. p., 1 app. from prot., tie 20 liters. p., 1 app. from prot., 1 l. n., the second - only l. p. We alternate 1-2 pp., if you do everything correctly, then in each new row there will be 2 loops more than in the previous one.
We change the thread to light gray and continue knitting: 3 rows, making increments through a row of 8 stitches (the first p. Without increases, the second with, the third without again). At each spa. we get 38 pips each
After the third knitted row, we divide the work into two parts, we will finish them separately.
Change the thread to black and close 5 pet. from the first cr. sp., then do 1 liter. item (in the case it will be + 1 chrome. item, after the item is closed) and make a decrease to the left.
Now you need to tie 28 liters. item from the first cr. cn., increase from prot. according to the drawing, we tie 1 l. item from the first cr. sp. The same sp. we knit the item from the second joint venture: 1 l. p., 1 app. from ave., 28 p. persons., 2 p. to the right, 1 person. item, 1 chrome. p.. The remaining 5 p. we throw off at the 3rd joint venture. - we will knit them later, exactly like items 3 and 4 cr. sp ..
At the main joint venture. we have 66 sts., we will knit them 2 sp. To keep the slope of the strips, in every 2 r. we will make increases from broaches to the center. parts. To the shirt front slightly narrowed below, in each river. we will make reductions. The second row is knitted in the following way: 1 cr. p., 1 and. p. 2 and. p. with incl. ow., 58 and. p. 2 and. p. with incl. e.g. 1 and. p., 1 cr. n .. By the same principle we need to knit everything out. pp., We will change the number of only medium and. p., reducing them each time by 2.
3rd r. (front): 1 cr. p., 1 l. n., 2 l. p. with incl. left, 27 liters item, 1 item from a broach, 2 l. item, 1 item from a broach, 27 l. n., 2 l. p. with incl. e.g. 1 liter p., 1 cr. n .. Also we will knit all the rest l. p., changing only the number of average liters. p. before and after the dividing strip, each time decreasing by 1 p.
Do not forget every 3 p. change the color of the thread. We got 4 gray stripes, but you can extend the product.
After the last knit a gray strip 10 p. garter stitching black thread, performing the entire scheme of increases and decreases.
The back is done by analogy with the front, only in the first r. close not 5 points, but 10. Last. 5 p., We also close with a separate piece of thread, so as not to break off the main one.
Video lesson
It is not always easy to navigate the first time in the patterns and descriptions of knitting with new things for yourself, even if at first glance everything seems simple. To make the process faster and more understandable, you can watch several video tutorials that will save the beginner from possible mistakes and clearly teach some craft tricks.
Video “How to knit a shirt front with knitting needles”
https://www.youtube.com/watch?time_continue=601&v=rdf8MlwcKEI






Very interesting models. Detailed description. Easy to fit. thank
I liked all the models. Easy knitting available. Even a beginner will cope
Very wonderful models. Everything is accessible, detailed and easy! Even a novice knitter will be able to tie the shirt-fronts for their beloved children (son or before a chka) and her husband! Thank you very much! And I took note of the shirt-front for the girl with the pattern of "leaves". I want to try to knit for myself)))
A wonderful article, very useful, especially for those who want to learn how to knit things that are pleasant for their loved ones and dear ones. And a wonderful gift for small and large. interesting ideas. The dickey is very comfortable for children, soft and warm. Thanks for the detailed information on knitting, clear and simple !!!!!