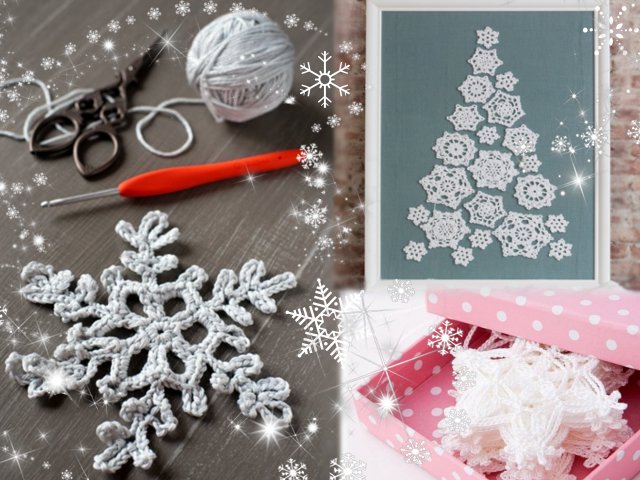
In the cold season, I so want to please ourselves and our loved ones with the beauty, which is so small around! And it’s not at all necessary to grieve over the summer days, you can bring comfort to the house based on a winter fairy tale, if you know how to create holiday symbols of winter with your own hands. To do this, you can use yarn, knitting needles or crochet. I must say that the winter theme in crochet or knitting is perhaps the most relevant, and the New Year theme is one of the most beloved by all the craftswomen - because it so cheers you up!
One of the many interesting winter elements that can decorate a house during the winter holidays, and even everyday life, are crocheted snowflakes. These are very cute and gentle openwork products that can be "applied" to the farm in a variety of qualities:
- Christmas decorations;
- holiday coasters for cups and glasses;
- christmas keychains;
- decoration-stickers for simple jar-bottles;
- decor elements for New Year's gifts and cards;
- patch for sweaters, hats, scarves.
In general, crocheted snowflakes will come in handy in everything that is enough for imagination. Today we will learn how to crochet these useful jewelry, and this will help in this scheme and descriptions, which will be useful for both beginner needlewomen and professionals who are in search of different options for snowflakes.
Crochet snowflakes - diagrams for beginners
The great news is that the shapes of crocheted snowflakes can be very different, as well as the sizes - which means they won’t be bored for sure. Moreover, after training practice, newcomers to crocheting can knit a snowflake according to their idea, having received an original and beautiful decoration of their own authorship.
But first, let's look at a few traditional crochet snowflakes. To learn how to crochet patterns that turn into snowflakes, you should adhere to the following recommendations and patterns.
How to tie the simplest snowflake?
Crocheting snowflakes is also suitable for beginners in this matter, if you choose among light options for patterns. We present several types of crocheted snowflakes that easily fit if you stick to the detailed description.
Simple crochet snowflake number 1

This snowflake is knitted according to the following diagram and detailed description with a photo:

We make a ring from the thread and knit 1 lifting air loop.
1st row: we knit 8 single crochet into a ring, tighten a ring of thread and knit a connecting column, introducing a hook into the first single crochet of this row.
2 row: we knit 3 lifting air loops + 2 air loops according to the pattern (i.e., we knit 5 air loops), knit a double crochet in the next loop, then we knit 2 air loops, * 1 double crochet in the next loop, again 2 air loops * from * continue to knit to the end of the row.

We close the row with a connecting column, we introduce the hook into the 3 air lifting loop.
3 row: in order to proceed to knitting from the arch, we knit 1 connecting column, then 2 lifting air loops, knitting 3 double crochets with a common top, then we knit 5 air loops, * in the next arch we knit 4 double crochets with a common top, again 5 stitches *, continue to knit from * to the end of the row. We close the row with a connecting column, introducing a hook into the common vertex of the columns.

4 row: we knit 1 hoop air loop and 1 single crochet in the same base loop, we knit a pico of 3 air loops, and a crochet in the same loop of the base, then we knit a pico of 5 air loops, and a single crochet in the same loop the base, we knit a pico of 3 air loops and a single crochet, introducing a hook into the same loop, then we knit 3 air loops * to the common top of the next group of columns we knit similarly 1 single crochet, a pico of 3 air loops, 1 single crochet, picot of 5 stitches, 1 single crochet, pic of 3 to air loops, 1 single crochet

Next 3 air loops *. From * we continue to knit to the end of the row. We close the row with a connecting column in the first column without the crochet of this row. It remains only to hide the ends of the threads and the snowflake is ready!

Let's try to crochet a few more options for simple snowflakes, and detailed master classes will help us with this.
Simple snowflake crochet number 2

To work with the diagram and description was easier and more convenient, we will use the following abbreviations:
VP - air loop;
PSN - half crochet with a crochet;
CCH - a column with the 1st yarn;
Sc - single crochet;
SS2N - a column with 2 double crochets;
SS3N - a column with 3 double crochets;
SS - connecting column.
Scheme and progress:

1st row: 4 VP (replacement of 1 SSN + 1 VP), * 1 SSN, 1 VP * 6 times. Tighten the sliding knot. Connect the circle of PSN in 3 VP of lifting a row.
2 row: 1 VP, 1 PRS in the same arch, * 5 VP, 1 PRS we knit in the arch between the CCHs of the previous row *. From * to * repeat to the end of the row. The row ends with 1 sc in the arch, 2VP, 1 sc in the first sc in the beginning of this row. Thus, each new row will begin in the middle of the previous petal.
3 row: 4 VP, 1 PRS in the same arch, * 5 VP, in the large arch we knit 1 PRS, 3VP, and in the same arch 1 PRS *. Thus, we repeat from * to * to the last arch. In the last arch of the row we knit 1 RLS, 3 VP, 1 RLS and finish the row of 2 VP, in the first rise VP we knit 1 CCH. And again, you should be in the middle of the petal.
4 row: 4 VP, 1 RLS in the same arch, * 7 VP, in the large arch we knit 1 RLS, 3VP, and 1 RLS * in the same arch. Thus, we repeat from * to * to the last arch. In the last large arch of the row we knit 1 SBN, 3 VP, 1 SBN and end the row of 3 VP, in the first VP of the rise we knit 1 SS2N. And again, you should be in the middle of the petal.
5 row: 4 VP, 1 PRS in the same arch, * 9 VP, in the large arch we knit 1 PRS, 3VP, and in the same arch 1 PRS *. Thus, we repeat from * to * to the last arch. In the last large arch of the row we knit 1 RLS, 3 VP, 1 RLS and end the row of 4 VP, in the first rise VP we knit 1 SS3N. And again, you should be in the middle of the petal.
6 row: 4 VP, knit 5 SBN in the arch, * 5 VP, in the large arch you knit 5 SBN-3 VP-5 SBN *. Thus, repeat from * to * to the end of the row. The row ends with 5 sc in the last large arch and the SS in the first 1 VP lift of this row.
We offer another version of a crocheted Christmas snowflake, which is useful in decorating the house.
Simple snowflake crochet number 3

You need to start knitting from the center, and you can do this in two ways:
- We make a chain of several air loops, connect it into a ring and knit further.
we wind a little ring on a finger from a thread and tie it with columns without a crochet; - We collect 5 air loops and close the ring. We knit the connecting column and 3 air loops of the first row.
Again we make a connecting column and three air loops, closing the arc with a connecting column. To make it clearer, we periodically look at the photo below.
There should be 6 such arcs.Close the row with a connecting post.
We tie the first arch-arch: 1 single crochet, 3 air loops, 2 single crochet.
We also tie the second and third arch: 2 single crochet, 3 air loops and 2 single crochet.
Repeat three more times. On this you can finish the master class for beginners. We already got a small openwork little star. But try to tie it even more and more beautiful.
Begin the third row with a connecting column. Further, the row report: 1 single crochet, 3 air loops, 1 single crochet, 5 air loops, 1 single crochet, 3 air loops, 1 single crochet, 2 air loops.
Repeat the row report 5 more times.
We got a crocheted openwork snowflake that can be starched and hung on a Christmas tree.

Master class on knitting beautiful snowflakes for the New Year
If the question “What would please household members during the winter holidays?” The answer is “do something beautiful with your own hands”, then crocheted snowflakes are exactly what you need! These small winter symbols can be used for a variety of purposes, and they will give a special mood, without exception, to everyone. But first you need to choose the appropriate crochet snowflake knitting patterns, and consider a few workshops.

Abbreviations for the description:
VP - air loop;
CCH - double crochet;
Sc - single crochet;
P5 - pico from 5 VP;
P3 - pico from 3 VP;
SS - connecting column;
PSSN - half crochet.
We knit a snowflake:
Please note that at the beginning of the row we knit VP instead of columns.
CCH = 3VP; RLS = 1VP.
We start with the ring.
1st row: * 2SSN with a common peak, 3VP * x 5 times, SS;
2 row: * (1СБН, 5ВП, 1СБН) - in one loop, 4ВП) * х 5 times, SS;
3 row: 3SS, in the arch of 5VP - 2SSN, 2VP, under the arch of 4VP - 1SBN, 2VP
* (2ССН, 3ВП, 2ССН) - under 5ВП, 2ВП, 1СБН under the trail. arch, 2VP) * x 4 times.
The end of the row - 2SSN in the first arch from which the row began, 1VP, 1SSN in the third VP;
4 row: under the newly connected PSSN - (1SBN, P5, 1SBN, P3), 2VP, 1SBN - in the 2nd SSN, P3, 2VP, under the SBS - SS. Half of the beam knitted.
The next five are knitted the same way.
We continue to knit after the SS
* 2VP, 1SBN we knit in SSN, P3, 2VP, under the arch - (1SBN, P3, 1SBN, P5, 1SBN, P3), 2VP, 1SBN in the 2nd SSN, P3, 2VP, under SBN - SS *.
We tied up five rays, and we tied the sixth - 2VP, 1SBN, P3, 2VP, under the first arch - 1SBN, P3, SS.
We fix the thread and cut it. The snowflake is ready!

Another option for crocheted snowflakes might look like this:

Abbreviations for the description:
P6 - pico from 6 VP;
SP - connecting loop;
RLS - SC;
VP - air loop;
CCH - double crochet.
We knit a snowflake:
At the beginning of knitting snowflakes, we collect a chain of 6VP. Do not forget about replacing the first columns of the VP:
- 3VP are equal to 1ССН;
- 1VP is equal to 1СБН.
1st row: 1VP, 11SSN, SP;
2 row: (2ССН, 3ВП) - 6 repetitions, SP;
3 row: (2СБН to the top of the second-line SSN, under the arch - 2ССН, 4ВП, 2ССН) - 6 repetitions, SP;

4 row: (2SP, in two SSN we knit 2СБН, under the arch - 1СБН, П6, 1СБН, 1ССН, three-leafed picot (П6), 1ССН, 1СБН, П6, 1СБН, 2СБН in the 3rd series СНС, 1ВП, skip two loops) - 6 repetitions , Joint venture.

We remove all excess threads, fixing them, and cut them off.
Starch openwork motif, align and fix with pins, let dry. Crochet snowflake ready.
Video lesson
Visual beginners always come to the aid of beginners in such a difficult task as crocheting, which help to avoid the simplest mistakes and draw attention to important points that master classes in photographs do not always convey in full. Here's a video lesson that will help crochet a snowflake even to those craftswomen who take it for the first time in their lives.
Video “crochet snowflakes for beginners”






Until that moment, it never occurred to me to knit snowflakes😁 but because a small child has appeared, you start thinking about how to decorate your Christmas tree and it’s beautiful and that the whole remains 😆 I’m very glad that I came across this article, I will bring ideas to life, I hope it turns out very beautiful🤩
I thought of linking snowflakes only because my daughter dresses up as a snowflake in a kindergarten, I want to make something unusual and very, very beautiful, from several different snowflakes, a beautiful top, and then fantasy, fantasy !! Thank you very much for the article, very simple and affordable !!!!
I am in 8th grade and still haven’t thought about it for some time, and when I was bored and wanted to see how to make them. But until the holidays these couple of days I will not knit, but as soon as they end I will try it with pleasure and hook it all over the room and the Christmas tree.💗🌹❄❄❄❄❄❄❄☃⛄