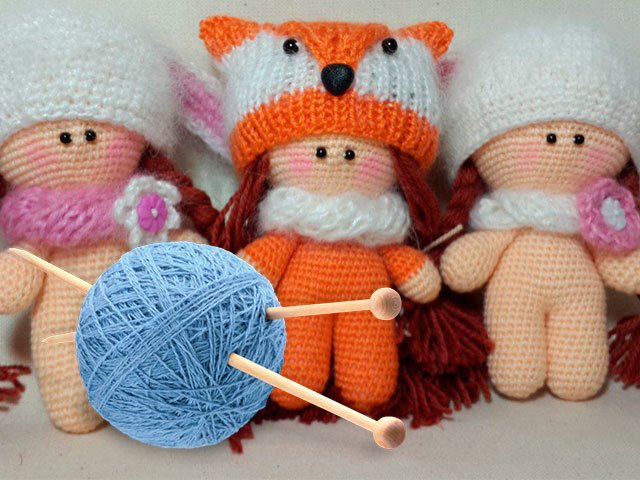
Girls of all ages love dolls - they are so beautiful, with a variety of clothes, they can be combed and dressed up. Take off is a pleasure to play. Knitted dolls are gaining more and more popularity and are becoming a new trend among children's toys. Such handmade knitted toys are very easy and quick to make, and today we will tell you exactly how.
A doll crocheted with your own hands is a great gift for your child, and you can knit not only a toy for a girl, but also for a boy: a pirate, Pinocchio, clown, etc. the main thing in this matter is the love that you put in each knitted chain!
Crocheted dolls: diagrams and description
Your child deserves the best, which is why today in our article exclusive crochet patterns and description of toys and dolls. The most interesting thing in making such a toy is you can pick the threads yourself (cotton, acrylic) color, add soft filler or not at all. Present fantasy flight, which will help you unlock your potential and creativity! So let's get started.


How to crochet a doll?
And the first thing that comes to mind: "How to crochet a doll?". The answer to this question is simple: follow the diagrams and clear description presented in our article. Besides the fact that you can create a doll yourself, you can also come up with her clothes: sew a vest, knit a ball gown, tights, trousers, hat, skirt, hat, coat, pants, sundress, jumpsuit, and don’t forget about socks! The most skilled ones can boast that they will make slippers or shoes for going to the theater to the doll.

Below you will find none Master Class, scheme and descriptionin which you will learn how to properly create knitted masterpieces for yourself or your children.
Crocheted dolls with patterns and handmade description
Let's start creating unique and original doll with pink hair. It will take a little bit of yarn for such a beauty, because it is small in size, but it still does not diminish its beauty!
Materials: threads (pink, coral, can be replaced with orange, green, gray and beige - closer to skin color), hook (1, 50 - 2, 5 mm), filler (to fill the torso, arms and head) and buttons for eyes. If it’s easier for you to work with purchased eyes or at all - to bind them, we do not limit you to anything! For the decor of this beauty, you can find any accessories: flowers, rubber bands for hair, a small handbag - She is still a girl. Another plus of such a toy: she can change her hair: braid braids, make ponytails.
The scheme and description of crocheting a doll with your own hands at home from the remains of yarn:
Crocheted lalalupsi dolls: schemes and description
Crocheted Lalapusi Dolls won the hearts of many girls. Each of them is unique, has its own character, its own unique style. One looks like a Parisian: she has her own beret, shoes, scarf, sweater and socks with a dress. Second: yoke with a purse and a hat. Third wears knitted sweater, shoes and pants. How to make such a unique fashionista - the secret of step-by-step creation is just for you!
Take flesh-colored threads. as in the previous micron, blue for hair and boots, a little blue, red and white. Buttons, felt, needle and thread for sewing are also needed.


Start knitting from the head: (each point corresponds to a new row, where necessary, we will mark its number)
- 6 S.B.N. (single crochet) in the ring amigurumi
- 6 P.R. (increase)
- 1 S.B.N., P.R. = 6 times
- 2 S.B.N., P.R. * 6
- 3 S.B.N., P.R. * 6
- 4 S.B.N., P.R. * 6
- 5 S.B.N., P.R. * 6
- 6 S.B.N., P.R. * 6
- 7 S.B.N., P.R. * 6
- 4 S.B.N., P.R., 4 S.B.N. * 6. At this point you should have 60 loops
- From the 11th to the 19th row, knit S.B.N. without P.R.
- Starting from the 20th R. - decrease (U.B.). 8 S.B.N., U.B. * 6
- 7 S.B.N., U.B. * 6
- 6 S.B.N., U.B. * 6
- 5 S.B.N., U.B. * 6
- 2 S.B.N., U.B., 2 S.B.N. * 6
- 3 S.B.N., W.B. * 6
- Fillers should fill the head of a future knitted toy and tie the neck.
- In 26 R. 12 U. B.
- 6 W.B.
- 6 S.B.N.
- 6 P.R. Total - 12 stitches (P.)
- A little secret in the photo below: how to make your head not hang down with cotton buds.

We continue our work from the place where we stopped:
• This is the 30th R. 1 S.B.N., P.R. * 6
• 5 S.B.N., P.R. * 3
• 6 S.B.N., P.R. * 3
• 24 S.B.N.
• 7 S.B.N., P.R. * 3
• 27 S.B.N.
• 8 S.B.N., P.R. * 3
• From 37 to 42 R. knit without P.R.
• 43 R. = 3 S. B.N., W. B. * 6
• 12 U. B. After this step, fill the body.
• 6 WB Close, tighten and make legs and arms as shown.
Knitted hands do as follows:
• 4 S.B.N. into the amigurumi ring.
• 4 P.R.
• 6 S.B.N., 3 V.P., S.S. (connecting column) in the 2nd P. from the hook, S.S. in 3rd V.P.
• From 4 to 18 R. = 8 S.B.N. Do not cut the thread.
Two crocheted legs do as follows:
• 6 S.B.N. in the ring amigurumi
• 1 S.B.N., P.R. * 3
• 3 and 4 R. = 9 S.B.N.
• 5 -7 R. = S.B.N., U.B.
• From 8 R. to 23 last = 8 S. B. N. Put arms and legs on the wire.
Hairstyle and bangs. Along the parting, put the threads twisted into bundles and sew them with the thread of the same color. The main thing - sew them very tightly together. Can be glued to superglue. Glue on the growth line of the lock - it will be bangs.
Dress: knit red thread V.P. (like a girth of a pupa’s waist) back and forth in two rows with it, in two rows of white. Make such 6 strips. Straps on the eye in length, add splendor by attaching the bottom of the coquette to the blue thread and knitting P.R. in each V.P.
Continue in a circle without P.R.. to the length you have chosen. Tie it with a “crib step”. On the dress, if desired, you can add any pattern, glue a flower, add details of their fleece and felt.
For flashlight sleeves use the floor S.T. = 3 circular R. from the blue armhole of the sleeve, then 3 P. together. Then 5 S.B.N. in each P. of the previous row.
Braids = Put twisted bundles on glue. Cheeks made of felt, eyes made of beads, bows according to the scheme below.
As you can see, linking it is not so difficult, you need a lot of patience and time. It is good that our section about knitting just helped you in this!
Crochet dolls for professionals with job descriptions
Dolls for professionals, amigurumi dolls are also considered - they seem to be not complicated, but they take a lot of time, you should have a good hand before performing them. It may take a lot of effort and patience, but the process is worth it. Even a real experienced craftswoman will spend a lot of time on such a hare.
The most remarkable thing is that no one will have a second doll like this! After all, even the same scheme and description reproduce everything in different ways. We offer you to connect a bunny doll with cute pink ears!
Let's start with the legs, which will need two pieces:
- Pink thread: 2 V.P., 6 S.B.N. in the second P. from the hook.
- (1 S.B.N., 2 S.B.N. from one P.) - until the end of the row
- S.B.N. in every S.T. (column) of the previous R., then change the thread color to cream or flesh for two S.T.to the end of R.
- 4, 5, 6, 7 and 8 R. = S.B.N. in every P.
- One leg complete S.S. in the first P. 8 p. To close. For the second leg: do not do this, leave the thread.

The hardest thing here - the body and head of a crocheted doll. We will provide a detailed description below.
- Fold the legs together. Enter the hook in the first P. of the first leg, grabbing the P. of the second leg and drag it through the first. S.B.N. into it, S.B.N. in the next 8 P. of the second leg. S.B.N. in 8 P. of the first leg.
- In the second R. = 2 S. B.N. from one P., 7 S.B.N. * 2
- 2 S.B.N., 2 S.B.N. from one P. = to the end of R., change the thread to pink for two S.T. to the end of R. use the filler.
- S.B.N. in all P.
- S.B.N. in all P. behind the back wall.
- S.B.N. in everything.
- 6 S.B.N., 2 S.B.N. together = to the end of R.
- S.B.N. in all P.
- 2 S.B.N. together, 5 S.b.N. = to the end of R. Fill the figure.
- 2 S.B.N. together, 1 S.B.N. = to the end of R. Change the color to beige for 2 S.T. to the end of R.
- 2 S.B.N. from one P., 1 S. B.N. = to the end.
- 2 S.B.N., 2 S.B.N. from 1 P. = to the end
- 3 S.B.N., 2 S.B.N. from 1 P. = to the end
- 4 S.B.N., 2 S.B.N. from 1 P. = to the end
- From 15 to 18 R.S.B.N. in all P.
- 4 S.B.N., 2 S.B.N together = to the end
- 3 S.B.N., 2 S.B.N. together = to the end
- 2 S.B.N., 2 S.B.N. together = to the end. To fill.
- 1 S.B.N., 2 S.B.N. together = repeat
- 2 S.B.N. together (before K.), S.S. Sew a hole.

The skirt is done like this (total 4 rows): We work with the front walls of P. 4 R. of the body and trunk. Pink bright color S.S. in P. behind the dolls, 1 V.P., S.B.N. in not the same, 2 S.B.N., 2 S.B.N. from one P., (3 S. B.N., 2 S. B. N. from 1 P.) * 5.
Second: S.B.N.
Third: Whole R .: 4 S.B.N., 2 S.B.N. from one P.
Fourth and the last: Whole R .: 3 V.P., S.B.N. next P. Close the job.
Two handles fit in seven rows.
- Flesh-colored: 2 V.P., 6 S.B.N. in 2nd P. from the hook
- Whole R .: 1 S.B.N., 2 S.B.N. from one P.
- Whole R .: 1 S.B.N., 2 S.B.N. together
- S.B.N.
- S.B.N. Change color in two S.T. to the end of R.
- S.B.N.
- S.B.N., S.S. first P. Close the job. The pen is filled and sewn to the toy.
Hair are made of pink, slightly lighter than the main thread. You can take a mohair. Wind the thread on cardboard (its width is 12 cm). cut the resulting "hair" on one side. Immediately fold two threads together, then in half. Using the hook inserted into the center of the doll's head, drag the threads and tighten it well. You can sew them with threads of the same color to the head, or stick them.
Bunny ears make pink vibrant saturated thread: dial 15 V.P., leaving 10 -15 cm from the first P. and from the last. To close. Ears fit in 7 rows:
- 2 V.P., 6 S.B.N. in the second P. from the hook.
- Whole R .: 1 S.B.N., 2 S.B.N. from one P.
- S.B.N.
- S.B.N.
- 1 S.B.N., 2 S.B.N. together.
- S.B.N.
- S.B.N., S.S. with the first S.T.
Sew ears to the middle of the straprelated in paragraph above. Sew eyes between 16 and 17 R. at a distance of 8 P. You can embroider black eyelashes. Do not forget about the mouth at 15 R. between the eyes.
Amigurumi crochet doll: handmade item
Such a doll can be crocheted for your daughter - She will certainly become her best friend. She can braid pigtails, change the outfit if desired. And, as usual, we start our work from the head! So, let's get started!
Yarn bodily or beige / cream shade (dots are rows where you will need to specify a separate R., we will do this):
- Amigurumi ring, 6 S.B.N. into the ring.
- 6 P.R.
- 1 S.B.N., P.R. * 6
- 2 S.B.N., P.R. * 6
- 3 S.B.N., P.R. * 6
- 4 S.B.N., P.R. * 6
- 5 S.B.N., P.R. * 6
- 6 S.B.N., P.R. * 6
- From 9 to 14 P.: 48 S.B.N.
- 15 R.: 17 S. B. N., P. R., 1 S. B. N. .. P. R., 9 S. B. N., P. R., 1 S. B. N. P.R. 16 S.B.N. (Total: 52 loops)
- From 16 to 18 P .: 52 S.B.N.
- 17 S.B.N., 1 U.B., 1 S.B.N., U.B. 4, S.B.N., U.B. 4 B., 1 S.B.N., U.B., 15 S.B.N.
- 2 S.B.N., U.B., 6 S.B.N., U.B. 10, S.B.T., U.B. ., 12 S.B.N., U.B., 4 S.B.N.
- 5 S.B.N., U.B. * 6
- 4 S.B.N., U.B. * 6
- 3 S.B.N., W.B. * 6
- 2 S.B.N., U.B. * 6
- 1 S.B.N., U.B. * 6. Close the loop.

Next, we begin to knit the body of the pupa. We start with a flesh or cream shade.
- Amigurumi ring and 6 S.B.N. in the ring
- 6 P.R.
- 1 S.B.N., P.R. * 6
- 2 S.B.N., P.R. * 6
- 3 S.B.N., P.R. * 6
- 4 S.B.N., P.R. * 6
- 7, 8, 9 P .: 36 S.B.N. Go to the pink color, or any other of your choice.
- 10 R .: 36 S. B.N.
- 36 S.B.N. behind the back walls.
- 10 S.B.N., U.B. * 3
- 36 S.B.N.
- 9 S.B.N., U.B. * 3
- 30 S.B.N.
- 8 S.B.N., W.B. * 3
- 27 S.B.N.
- 7 S.B.N., W.B. * 3
- 24 S.B.N.
- White color: 2 S.B.N., W.B. * 6
- Beige color: behind the back walls 18 S.B.N.
- 18 S.B.N.
- 18 S.B.N.
- To tie the collar of the dress, turn the toys upside down and find the last P. 21 R. White: behind the front walls. Stretch through 1st P., 2 V.P., 2 S.S.N. in not the same. 2 S.S.N. in the same P. * 7; 2 S.B.N .; 2 S.S.N. in the same P. * 8, S.S. in the first S.T.

Further, our product comes with handles and legs.
- Beige amigurumi ring and 6 S.B.N. into the ring.
- 6 P.R.
- From 3 to 5 R. 12 S.B.N.
- 2 S.B.N., W.B. * 3
- 1 S.B.N., U.B. * 3
- From 8 to 10 P .: 6 S.B.N.
- Pink: 1 S.B.N., P.R. * 3
- From 12 to 20 p.: 9 S.B.N.
- R. 21: knit S.S. the edges.
Legs in black:
- 7 V.P. Expand knitting, start with 2 P .: 2 S.B.N., 2 S.B.N. 2 S.S.N., 5 S.S.N. in the same P., continue on the other side of the chain. 2 S.S.N., 2 S.B.N., P.R., S.S. in 1 P.
- P.R., 3 S.B.N., 3 S.S.N., 3 S.S.N. in the same P. * 3, 3 S.S.N., 3 S.B.N., P.R., S.S. first P.
- For the building of the wall 25 S.B.N.
- Violet 25 S.B.N.
- 7 S.B.N., 1 S.S.N., 2 S.S.N. together * 5, 1 S.S.N., 6 S.B.N.
- Beige thread: behind the wall building 7 S.B.N., 3 U.B., 7 S.B.N.
- 6 S.B.N., 3 U.B., 5 S.B.N.
- 5 S.B.N., 2 U.B., 5 S.B.N.
- 6 S.B.N., U.B., 4 S.B.N.
- 11 S.B.N.
- 5 S.B.N., U.B., 4 S.B.N.
- From 12 to 27 P .: 10 S.B.N.
- Edge knit S.S. and sew to the torso.

And the last thing is skirt: again, we turn the chrysalis upside down and find the last P. at 11 R. With a pink thread for the front walls, stretch the yarn through the 1st P., 2 V.P.
R. 1: 2 S.S.N., P.R. * 12
2, 3, 4 P .: 48 S.S.N.
5 R .: 48 reverse S.S.N. Close the canvas and the work is ready !!!
Crochet doll workshop
The baby with the little red riding hood is a new interpretation of the old fairy tale loved by everyone. But what if you can tie one yourself? This, of course, is not for beginners, but it's never too late to learn and learn something new.
Body and head of beige thread (knit 31 row).
- 6 S.B.N. Into the Amigurumi Ring (K.A.)
- 6 P.R.
- 1 S.B.N., P.R. * 6
- 2 S.B.N., P.R. * 6
- 3 S.B.N., P.R. * 6
- 4 S.B.N., P.R. * 6
- From 7 to 13: 36 S.B.N.
- 4 S.B.N., U.B. * 6
- 3 S.B.N., W.B. * 6
- 2 S.B.N., U.B. * 6
- 1 S.B.N., U.B. * 6
- 2 S.B.N., W.B. * 3
- 2 S.B.N., .P.R. * 3
- 1 S.B.N., P.R. * 6
- Replace with white: 3 S.B.N., P.R. * 6
- From 23 to 26 P .: 30 S.B.N.
- Behind the back wall 30 S.B.N.
- Change thread again
- 30 S.B.N.
- 3 S.B.N., W.B. * 6
- 2 S.B.N., U.B. * 6
- 1 S.B.N., U.B. * 6
- 6 W.B.
- Fill and close the row. We return for 27 R. in order to make a skirt.
- 30 S.B.N.
- 4 S.B.N., P.R. * 6
- 5 S.B.N., .P.R. * 6
- 6 S.B.N., .P.R. * 6
- Change the thread to red: 1 S.B.N., 3 S.S.N. in one P., 1 S.B.N., 3 S.S.N. in one P. of the previous R., further in a circle. Close the job.

To create a beautiful accessory - hat, take the red thread and type:
- 6 S.B.N. in K.A.
- 6 P.R.
- 1 S.B.N., P.R. * 6
- 2 S.B.N., P.R. * 6
- 3 S.B.N., P.R. * 6
- 4 S.B.N., P.R. * 6
- 5 S.B.N., P.R. * 6
- 6 S.B.N., P.R. * 6
- 48 S.B.N. behind the back wall of each P.
- 48 S.B.N.
- 48 S.B.N.
- 48 S.B.N.
- 7 S.B.N., P.R. * 6
- 56 S.B.N.
After done this job, you need to add a loop and a little white bow to the cap. For a bow do 12 V.P., in 2 P. = 12 S.B.N. At the end of any R. - turn the product over. From the second to the sixth R. = 12 S.B.N. Everything is ready!
For loop - a chain of 8 V.P. In the 2nd from the hook P. 7 S.B.N. Sew it to the hat, not forgetting to pass the bow.
For the straps on the dress - 31 V.P. Second Second R. = 31 S. B.N.
Hands and feet need two parts. Let's start with the hands: 4 S.B.N. in K.A. Second R.: 4 P.R. Third: 8 S.B.N. Fourth: 2 S.B.N., W.B. * 2. From 5 to 9 row 6, S.B.N. Fill the resulting parts.
We start knitting legs with red color: 5 S.B.N. in K.A.
- 5 P.R.
- 3 and 4 R .: 10 S. B.N.
- Now you need to take a beige and knit R. to 8: 10 S.B.N.
- 3 S.B.N., W.B. * 2
- 4 U.B.
For cheeks, dial 6 S.B.N. and close in K.A. Tie your hair.
Crocheted clothes for dolls
Clothes for dolls are crocheted very easily, as well as knitting. She is simply indispensable in the wardrobe of the "little fashionista." Next you will find very informative and detailed video tutorials.


Crochet doll dress
How to Crochet a Dress for Barbie Dolls for Beginners
How to Crochet a Beginner Doll: Video








A lot of useful information, thanks, inspired!
There was a desire to try my hand in a new direction - knitting dolls. The article is very interesting, good descriptions and many tips.An interesting collection of knitted dolls is presented. It’s just wonderful how talented knitters are!